Forskjell mellom versjoner av «Metroplex 3D printer/bygging»
m (→Historikk: formatting) |
(lagte To-do seksjon) |
||
| Linje 1: | Linje 1: | ||
Tilbake til [[Metroplex 3D printer]]. | Tilbake til [[Metroplex 3D printer]]. | ||
| + | |||
| + | == To-do == | ||
| + | Følgende ting gjenstår før Metroplex kan brukes. | ||
| + | |||
| + | === Bygging === | ||
| + | Gjenstående arbeid | ||
| + | * finne ut hvordan Z-probe kitet skal festes, montere og koble det opp | ||
| + | * reparere / forbedre viftefeste på hotend | ||
| + | * kable ferdig | ||
| + | * lage filamentholder | ||
| + | |||
| + | === Konfigurering og kalibrering === | ||
| + | Printeren er satt opp med BeagleBone og Replicape<ref>[https://www.thing-printer.com/product/replicape/]</ref> i dag. Kanskje det blir erstattet med Revolve<ref>[https://www.thing-printer.com/revolve/]</ref> i fremtiden. | ||
| + | |||
| + | Må settes opp, konfigureres og testes. | ||
| + | |||
| + | === Testing === | ||
| + | * Kalibrere printeren. | ||
| + | * Kjøre testprint. | ||
== Historikk == | == Historikk == | ||
Revisjonen fra 24. mai 2019 kl. 14:56
Tilbake til Metroplex 3D printer.
Innhold
To-do
Følgende ting gjenstår før Metroplex kan brukes.
Bygging
Gjenstående arbeid
- finne ut hvordan Z-probe kitet skal festes, montere og koble det opp
- reparere / forbedre viftefeste på hotend
- kable ferdig
- lage filamentholder
Konfigurering og kalibrering
Printeren er satt opp med BeagleBone og Replicape[1] i dag. Kanskje det blir erstattet med Revolve[2] i fremtiden.
Må settes opp, konfigureres og testes.
Testing
- Kalibrere printeren.
- Kjøre testprint.
Historikk
- 2019-04-04
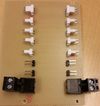
- today (finally!) I soldered connectors to the connector board.
 . Tingo (diskusjon) 4. apr. 2019 kl. 14:28 (CEST)

- 2019-02-28
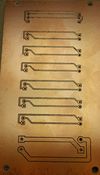
- using the CNC3-3018Pro, I made a small connector board for the printer.
 Tingo (diskusjon) 4. apr. 2019 kl. 14:17 (CEST)

- 2019-01-23
- Elias and I tapped threads in the center holes of the aluminum rods, and screwed the top plate on. The cabling was moved, it needs to find a new home under or inside the aluminium rods at the top. Next we tapped threads for the bottom plate and screwed that on. Both operations required adjusting the length between the corners a bit. Finally we mounted the plate underneath the printbed. Because of the length adjustments between corners, the holes didn't fit, so we had to drill new holes. As usual pictures in the gallery below. Tingo (diskusjon) 23. jan. 2019 kl. 17:58 (CET)
- 2019-01-22
- the Precision Piezo Universal Z-probe Kit[3] that Jon C sent arrived. Thanks! Tingo (diskusjon) 22. jan. 2019 kl. 15:50 (CET) Tip from Jon C "Make sure to put a few millimeters of wood or silicone pads to insulate from the heat." Tingo (diskusjon)
- I dag har Elias og jeg frest ut topp-, bunn- og baseplater[4] til Metroplex. Se bilder lenger ned. Tingo (diskusjon) 22. jan. 2019 kl. 15:37 (CET)
- 2019-01-15 - 2019-01-18
- learning to use FreeCAD, I create (with help from others) design for a bottom plate (sits between the frame and the print bed), a top plate and a base plate (under the printer). Tingo (diskusjon) 21. jan. 2019 kl. 14:29 (CET)
- 2019-01-14
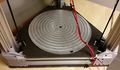
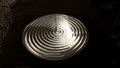
- Elias and I (with lots of help from other with more CNC experience) plane down a round aluminum plate that will be used as print bed for the Monster Kossel.
- 2019-01-10
- the Monster Kossel gets a name: Metroplex[5].
- 2019, first week of January
- Jon C. comes to Bitraf and builds the Monster Kossel. He has put some pictures of the build here[6].
Bilder
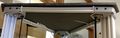
Topp-, bunn- og baseplate montert.
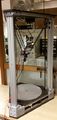
Metroplex har fått montert plater.
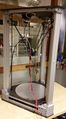
Metroplex sett fra en annen vinkel.
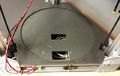
Metroplex - nærbilde av printbed.


Lage plater til topp, bunn (under printplate) og base (under printeren).
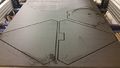
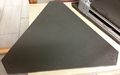
Slik ser resulatet ut etter at vi har frest.
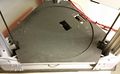
Testfit av bunnplate - ja den passer.
Bunnplata fra en annen vinkel.
Topp-plata ser også ut til å passe. Vi må flytte kablingen litt.
vi lagde ei ny baseplate også, med skruehull i.


Fresing (planering) av aluminium printbed.
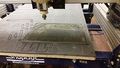
klar for å frese en pocket til aluminiumsplata.
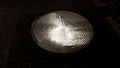
etter noe fresing av alu plata.
sånn, nå er alu plata ferdig frest.


