Laser
Innhold
- 1 Plassering
- 2 Bruk av laseren
- 3 Vedlikehold
- 4 Software
- 5 Innstillinger for forskjellige materialer
- 6 Kerf
- 7 Rotary axis attachment: laser engraving and cutting round objects
- 8 Hvor kan du kjøpe materialer
- 9 Debugging / feilsøkning
- 10 Innkjøp
- 11 Dokumentasjon
- 12 Reparasjon
- 13 Logg over anskaffelse, oppsett, kontroll og testing
- 14 Referanser
Plassering
Laserkutterne står i eget rom i øvre etasje. Foreløpig må man gå gjennom Male/Lime/Støpe-rommet for å komme inn i laserrommet, men på sikt vil rommet få egen inngang fra inngangspartiet i øvre etasje.
Bruk av laseren
Tilgang
Laserkutterne er kun tilgjengelig *for medlemmer og kontorplass-brukere* på Bitraf, altså ikke for gjester. Bli medlem!
Maskinene er utstyrt med tilgangskontroll, du må sjekke ut maskinen før bruk, og sjekke den inn igjen etter bruk.
Du må ha *gjennomført kurs* i grunnleggende bruk og sikkerhet før du kan bruke laseren. Kurs legges ut på meetup.com/bitraf jevnlig.
Du forplikter deg også til å forlate laser-rommet rent og ryddig – uansett hvordan rommet var når du kom.
Er du medlem uten kurs, men har behov for å få gravert eller skjært noe, kontakt Thomas, Jensa eller Jon.
Hvis du heller vil betale noen for å utføre en jobb kan du legge ut en melding på Slack #lasercutting eller Facebook-gruppen vår.
Booking
Laserne bookes på forhånd via en google kalender. Se her for hvordan du får tilgang til kalenderen: https://bitraf.no/wiki/Booking
Kommersiell bruk
Dersom man gjør *kommersielle jobber*, betaler man 350 NOK/time (+moms) for bruk av laseren. Kommersiell jobb er en jobb hvor man enten får betalt for å lage noe eller gjør produksjon av noe man selger selv. Dette bidrar til kostnadene ved vedlikehold, samt for å ikke urettferdig konkurrere med andre som leverer tjenester rundt laser, og at ikke bruken blir monopolisert av noen enkelte som driver gratis masseproduksjon.
Kommersiell bruk betales normalt i Bitmart med kort. Legg inn epost så får du kvittering på epost. Dersom du trenger en faktura, kan du istedet skriv en epost til "kasserer (at] bitraf.no" og spesifiser antall timer bruk og dato.
Arbeidsområde
Rød Laser: 680 mm * 480 mm
Blå laser: 880 mm * 570 mm
I Bitmart selges 4 mm bjørkefinér i formatene 680 mm * 480 mm og 540 mm * 480 mm. I tillegg finnes ymse andre materialer i 540x480mm. Poppelfinér var tidligere til salgs i ferdigkappa størrelser til laseren, men fås nå kun i stor plate (2440x1220mm).
Programvare for bruk av laserne
For å bruke laserne må du først lage et design og deretter legge in innstillinger for jobben. Se: Laser-software
Steg
Dette er de grunnleggende stegene man går igjennom for å lage noe med laseren.
- 1) På forhånd: Lag eller last ned et design. Exporter til DXF
- 2) PC: Importer vektorfil (DXF)
- 3) PC: Lag verktøybaner
- 4) PC: Eksporter jobben til laser
- 5) Laser: Legg i materiale
- 6) Laser: Fokuser laseren
- 7) Laser: Sett jobb Origin
- 8) Laser: Kjør jobben
- 9) Laser: Ta ut materiale
For detaljert beskrivelse, se Laser-steg
Vedlikehold
Software
Innstillinger for forskjellige materialer
Forskjellige innstillinger må brukes på forskjellige materialer.
Kerf
Kerf[1] er den delen av materialet som laseren brenner bort, og som gir "slark" når du skal sette sammen deler. Kerf vil variere etter materialtype og -tykkelse. På Thingiverse finnes en modell[2] som du kan kutte ut i ønsket materiale for å finne ut nøyaktig hva kerf'en er.
Rotary axis attachment: laser engraving and cutting round objects
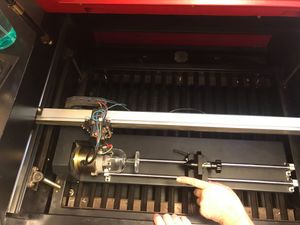
The red laser has a rotary axis attachment. This means we can draw, engrave, and cut materials that are round.
Important…
NEW guidelines: When installing the rotary axis inside the laser, place it with the chuck (spindle, heavy end, jaws, grip) to the LEFT. Why? Should you turn off and on the laser, the laser head will attempt to "home". Since one axis is now rotating, and only one axis moves the laser head, it will then "home" to the far right. IF the rotary axis thingamabob is placed with the chuck to the right, the laser head will crash into the chuck and potentially be seriously damaged.
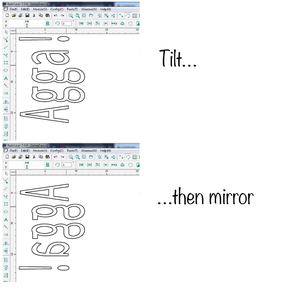
Prepare files: formulae
The object is round. It spins at a certain speed depending on your settings. To account for this, the artwork needs to be "distorted" in the software so it will turn out correctly on the object. You need to know:
- Diameter of the object (at the place where you will engrave/cut)
- Length of the artwork
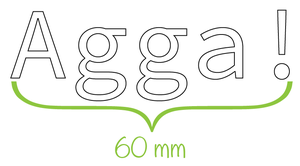
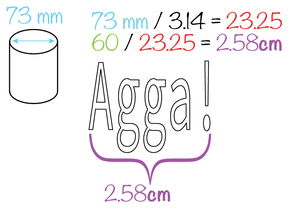
drawing width/(object diameter / 3.14) = drawing width to use in autolaser
Example
Prepare laser
- Run the laser head to top right corner
- Lower the bed… a lot (U-)
- Remove the honeycomb
- Move laser head approx half way on the y axis
- TURN OFF the laser before opening the the bottom panel on the right side of the laser
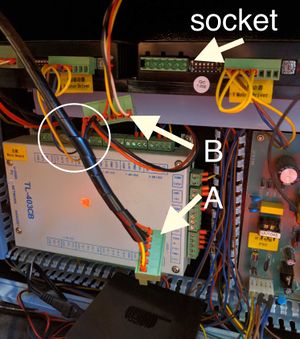
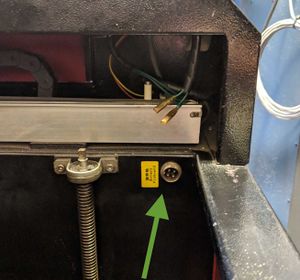
- Swap connectors behind the panel (see image).
- Basically: there are two connectors (A and B) attached to each other (or rather: they come out of the same twisty-cable-holder-thing), and one is plugged in to the socket.
- Swap them
- Close the lid
- ALWAYS PUT the normal one BACK when finished. If someone didn't attend the Rotary-attachment training, they'll have NO idea why the laser isn't working.
- Turn the laser on. It should now be unable to "home" normally (go to the top right corner), as one axis now is the rotary, but will "home" on the Y axis, sending the laser head all the way over to the right side.
Rotation max/min
Even if the rotary attachment has no physical endpoints, the laser control software will have a max/and min position. You will probably want to do your work while the laser is in the middle of these points. This can be achieved by rotating the attachment using the up/down button to one end, counting the number of seconds it takes to rotate all the way to the other end, and then rotating it back approx half as many seconds as a max-min-movement takes. If you try to range or start a job while the laser is to close to the max or min positions you will get a outbound (out of bounds) error on the display panel.
"Jaw"
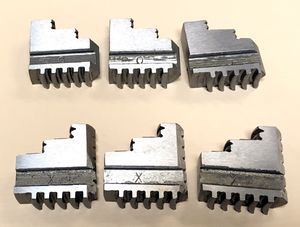
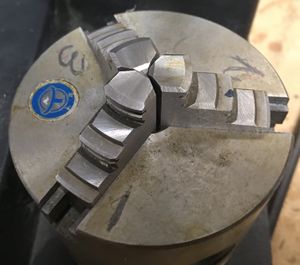
Decide which teeth you need. There are two types, each a set of three: expanding and contracting. The expanding secures the object to the spindle by pushing from the inside out. (for concave glasses) The contracting ones secures the object to the spindle by pushing from the outside in. (for convex glasses)
Both the expanding (inner diameter of work piece) and contracting (outer diameter of work piece) teeth have a work area (max/min diameter) of approx. 2.5cm to 7.5cm.
They are numbered, and marked:
- X for expanding (best for concave objects ends)
- O for contracting (best for convex objects ends)
How to attach
The teeth and the chuck key should be in a dedicated box on the tall shelf behind the door.
- To attach the teeth, place each of the three teeth in their correspondingly numbered slits 1, 2, 3.
- The pointy end goes in towards the center (so that when fully tightened it forms a compact shape of three triangles)
- Hold them in place with one hand, with a finger on each.
- Use the chuck key and screw OUTWARDS. ONLY use the special chuck key that came with the rotary axis.
- Keep screwing outwards until you feel number one click.
- Keep screwing outwards until you feel number two click.
- Keep screwing outwards until you feel number three click.
- Here is the surprise: Keep screwing outwards until you feel number one click again.
- Gently start screwing inwards.
- Screw all the way in, and visually check that the teeth align perfectly in the center. If they don't, your material will rotate off center, and potentially break your material, the attachment and/or the laser head. So if they don't line up perfectly, do it again.
Place the rotary axis attachment inside the laser
- Carefully place the rotary axis attachment inside the laser with the jaws (spindle, chuck, heavy end…) to the LEFT.
- Attach the coax cable from the rotary axis attachment to the connector inside the laser. When you stand in front of the laser, it is bottom right. The connector is marked with a yellow sticker: "rotary pinboard" (see image).
- From now on you must be VERY careful not to smash the laser head into stuff
Align the probe over the desired area and set focus point as normal, with .+enter.
To be super careful, drive the laser head away from the rotary axis attachment, and do a range test in an area where it will not smash into anything, should there be a … mishap. Pay careful attention to how the probe moves, and how the rotation moves. If it seems as expected, drive the laser head to the place where you want the job to begin. Note that you do not align with the probe, but the laser.
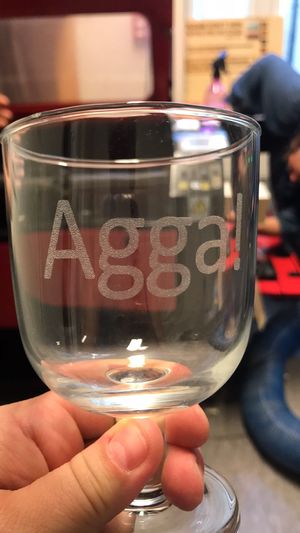
Glass surface: Preparation
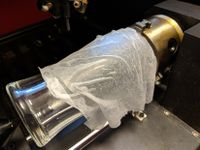
Using a moist paper towel helps prevent the engraving area from becoming rough, and leads to a clear, white engraving result. Before you start engraving, apply a moist single-layer paper towel to the glass. Make sure there are no air bubbles or overlaps. This would affect the engraved image.
We have so far had success with one ply from the two-ply towels from the bathrooms, damped liberally using a spray bottle (i.e. the fire-bottle in the laser room).
Do not spray water inside the laser.
Suggested settings
IKEA rødvinsglass, IKEA beer glass, IKEA tall beer glass raster: 100 mm/s 50%
Hvor kan du kjøpe materialer
Det finnes en god guide om hva slags materialer som kan brukes hos AtxHackerspace.
Bitraf-medlem Peter Watz har mange års erfaring med Laser og har laget en god oversikt over materialer som er gode å bruke. Han kan også hjelpe deg med kommersielle jobber: kreativ-laser.no
Bitmart
Fra September 2015 har vi akrylplater til salgs i Bitmart, i diverse tykkelser og størrelser - til en veldig god pris.
Fra Desember 2015 har vi poppelfiner, 4mm og 6mm til salgs i Bitmart. Priser rundt 50 kr for en plate som passer i laseren.
Leverandorer
Plastcompaniet A/S på Alna, leverer akrylplater og annen plast, i større kvanta.
Man får også akrylplater på Biltema og Clas Ohlson, men da ganske dyrt.
Biltema selger "plastglass" som er Styren-plater. Disse lukter mindre enn Akryl når de skjæres, men får veldig lett stygge smeltede kanter.
Når det gjelder gravering/kutting av tre, anbefaler de som har erfaring at man skaffer seg "Flyfiner" eller "Poppelfineer". Oslo Finerfabrikk AS has dette, og mange andre materialer som kan være interessante.
Christ. Engebretsen & Søn AS holder til i Pilestredet 27 og har et godt utvalg av papp, kartong og papir https://www.tegne.no/
Debugging / feilsøkning
- The laser turns on, but the laser will not fire. The LED on the laser is green.
- Remember to check out the laser at p2k16/tools
- The fan for the red laser will not start (even if there is a green light on the rear of the fan)
- If the power has been out (fuse blow, etc), the fan for the red laser has to be turned on using the fan panel (use a ladder or long pole)
Innkjøp
Se Laser - Logg, anskaffelse, oppsett, kontroll og testing
Dokumentasjon
Se Laser - Logg, anskaffelse, oppsett, kontroll og testing
Reparasjon
Feilsøking og reparasjon: Se Laser-vedlikehold
Logg over anskaffelse, oppsett, kontroll og testing
Laser - Logg, anskaffelse, oppsett, kontroll og testing
