Band saw English
Innhold
Basic bandsaw usage
Safety an general usage
Before using the bandsaw
Never connect power to a machine before you have made a preliminary check everything is in order with the machine.
Always write in Bitraf's calendar: name, tool (Bandsaw), phone number, date and time from and until which you will use the tool. Access to the calendar and how it is used can be found here: [[1]].
Check out key # 6 to unlock the band saw.
- Check inside the saw whether the person before you has cleaned after using it, if not clean before you start.
- Connect vacuum cleaner to saw.
- Check if the blade is sharp - feel with a finger - if the blade is dull - stop work.
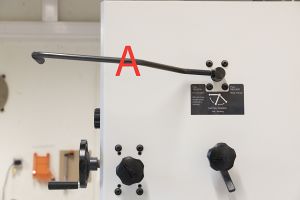
Lever A (Figure 1) at the back of the band saw must always be in a horizontal position when the saw is in use. Then the saw blade will have the correct blade tension.
With the saw blade that is usually found on the band saw, you should only cut wood and plastic materials. It is not recommended to rip thick planks with this blade. (The dimensions of the blade are 13mm wide with 4 TPI (teeth per inch))
Adjust the upper blade guide to the correct height
Before you start the saw, set the blade guide to the correct height for the job you're going to do.
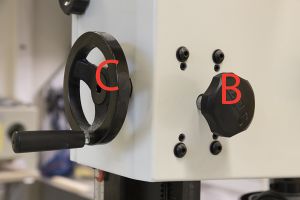
You do this by loosening lock knob B (Figure 2). You then adjust the blade guide to the correct height for what you are going to saw by turning the wheel C. Lock the blade guide by turning the locking knob B.
For straight cuts, the blade guard should be as close to the workpiece as possible, approx. 2.5 cm above the workpiece.
If you need to cut curves, the blade guard can be raised. With the blade guard 10-15 cm above the workpiece, you can have a good view of what you're dooing.
The purpose of the protective housing on the saw blade is to protect the user and to stabilize the saw blade laterally.
When these checks have been completed, you are "good to go"!
Connect power to band saw.
Connect a vacuum cleaner if you haven't already.
Turn on the vacuum cleaner.
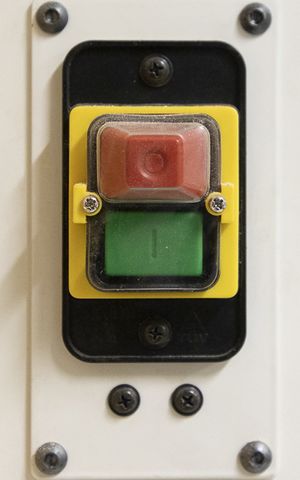
Start the saw by holding the green on button for ½ second (Figure 3).
Safety and usage
Do not use machines at Bitraf if you are tired or under the influence of alcohol or other drugs.
Never walk away from a running machine without supervision.
Remove ties, scarves, rings, watches and other jewelery before using the band saw. Also put up long hair.
Always keep fingers (and other body parts, including hair and beard) outside the black circle around the saw blade.
Gloves, loose sleeves and loose clothing should not be used when working with rotating tools – including bandsaws!
Use a dust mask, safety glasses and hearing protection! Tinnitus, damaged hearing and damaged vision are not cool!
Fine dust particles that you breathe in can cause discomfort and an increased risk of cancer and lung diseases.
Use a push stick and/or push block when cutting small or narrow workpieces!
Be concentrated on the work, not on other things when using machines. If you are going to talk to others, turn off the saw.
Do not work with the wood upright or in any other unusual positions without support. Round objects and other materials that do not lie flat against the saw table and/or fence must be attached to other materials with screws or clamps for stability!
Bandsaw blades are subjected to high stresses and breakage are sometimes unavoidable. Some common causes of blade breakage are:
- you use a too wide blade to cut a curve with a small radius
- you use too much force to guide the workpiece towards the blade - instead, let the blade work through the material without using force
- upper blade guide too high above the work piece
- blunt or uncorrectly set saw blade teeth
- incorrectly adjusted blade guides
- too high blade tension
- fault in the blade welding joint
Should the machine start making strange noises - stand back and press the red stop button (Figure 3).
Small pieces of wood are removed from the saw table after the saw blade has stopped – not before!
Adjust angle on the saw table
Disconnect the power from the band saw.
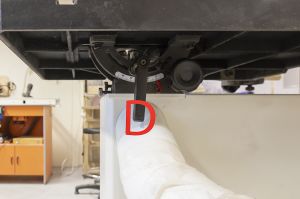
Release locking lever D (Figure 4). The saw table can be tilted up to 45 degrees towards the right seen from the front. Tighten locking lever D when you have the angle you want.
Remember to return the saw table to the horizontal position when you are finished.
Position on fence and rail
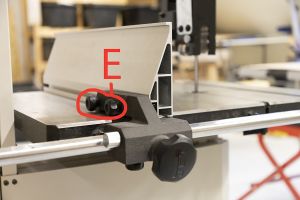
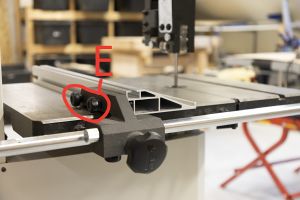
The fence can stand upright or lie flat on the saw table. Use the screw knobs E (Figure 5 and 6) to loosen and fasten the fence.
Fine-tuning of fence position
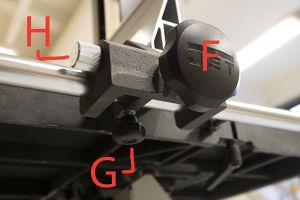
Loosen the fencevwith locking knob F and small knob G under the rail (Figure 7). Push the fence to the approximately desired position and lock it to the rail with small knob G. Fine-tune with millimeter wheel H and lock with locking knob F.
Straight cuts
Feed the workpiece straight ahead, possibly by using the fence as a sideways support.
Curved cuts
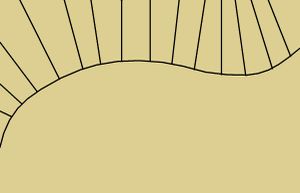
DO NOT force the tool to do something it cannot do. When the regular saw blade that is mounted on the saw, you cannot saw arcs where the "approximately straight" area is less than 1.5 cm. Arches must then be sawn in segments with straight cuts from the side towards the arch as shown (Figure 8).
Can't be said too often: Gloves and loose (sleeves on) clothing should absolutely not be used on any rotating tool – band saw included!
Some things to be aware of:
Thick or tall materials put extra wear and tear on the saw blade - write a message on the Woodwork channel on Slack or to someone responsible for the tool so we can check if it needs to be replaced!
Since the blade on the band saw moves down towards the saw table, the general risk of kickback is small compared to table saws. BUT: you still have to be careful with round objects, refer to what is written in the "Safety and use" section about working with the material upright or in unusual positions without support.
Practical exercise
Find a piece of wood and try a couple of cuts on the saw!
Small pieces on the saw table: Stop the machine BEFORE you remove them!
Burn marks in thin panels: Could be a problem with a worn saw blade!
When finished using the band saw
Unplug the power to the band saw and put the lock on the plug.
Always clean the tool and the floor around after you! Open and clean inside the saw. Use compressed air in places that are difficult to access, and vacuum cleaner where you reach. Clean the saw blade if there is a lot of dirt on it. Then the person using the saw after you're finished doesn't have to spend their time cleaning up after you - this contributes to a healthy environment at Bitraf! Remember the "do-o-cracy" at Bitraf!
If someone has forgotten to clean - clean up after them too, since this contributes to Bitraf beeing a nice place to come - and people perhaps also to treat our equipment better.
Finish off by checking in the key.
