Forskjell mellom versjoner av «Making your own reels from cutoffs»
| Linje 3: | Linje 3: | ||
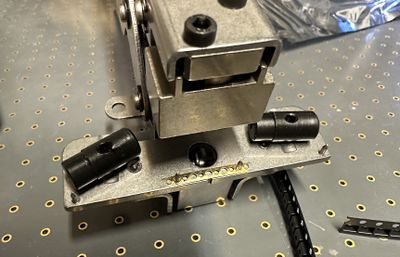
Start by getting the special plier tool and the clips from the shelf above the [Pick_and_place] machine. Open the tool and put a metal clip so the holes align up as in the picture. If you feel the clip, it has small and sharp protrusions sticking out on once side. Make sure these align to the top and the smooth side down. These will press into the holes on the reel pieces we are joining. | Start by getting the special plier tool and the clips from the shelf above the [Pick_and_place] machine. Open the tool and put a metal clip so the holes align up as in the picture. If you feel the clip, it has small and sharp protrusions sticking out on once side. Make sure these align to the top and the smooth side down. These will press into the holes on the reel pieces we are joining. | ||
| − | [[Fil:SMT Tool, adding clip.jpg|400px|miniatyr| | + | [[Fil:SMT Tool, adding clip.jpg|400px|miniatyr|sentrer]] |
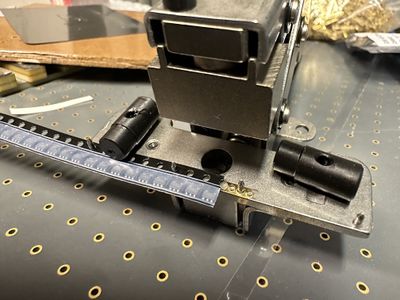
Next, add the component cut-off that you want to join/extend to the left side of the tool. Center it as well as as doable (given the holes) and twist the black plastic thing to hold it in place. | Next, add the component cut-off that you want to join/extend to the left side of the tool. Center it as well as as doable (given the holes) and twist the black plastic thing to hold it in place. | ||
| − | [[Fil:SMT Tool, adding first reel.jpg|400px|miniatyr| | + | [[Fil:SMT Tool, adding first reel.jpg|400px|miniatyr|sentrer]] |
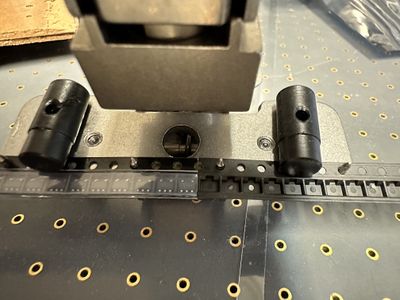
Now you can head over to the [Pick_and_place] machine with some pliers and look for a piece of empty reel with the same dimensions that you have. Formerly we just threw these in the bin, not now they are great for just this process. Cut off 20-30cm and add it to the tool on the right side. The better the alignment with the component cutoff - the less hassle when putting this in the feeder. When you're happy - twist the black plastic piece on this side also to hold it in place. | Now you can head over to the [Pick_and_place] machine with some pliers and look for a piece of empty reel with the same dimensions that you have. Formerly we just threw these in the bin, not now they are great for just this process. Cut off 20-30cm and add it to the tool on the right side. The better the alignment with the component cutoff - the less hassle when putting this in the feeder. When you're happy - twist the black plastic piece on this side also to hold it in place. | ||
| − | [[Fil:SMT Tool, ready to press.jpg|400px|miniatyr| | + | [[Fil:SMT Tool, ready to press.jpg|400px|miniatyr|sentrer]] |
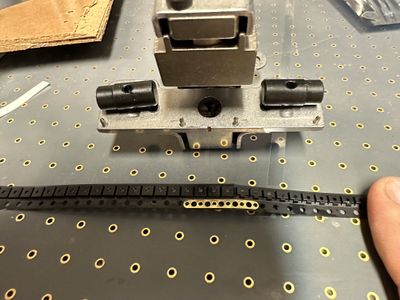
If it looks good, press the pliers well together but there is no need to use excessive force. If you flip it around, you'll now see the clip holding the two pieces well together. | If it looks good, press the pliers well together but there is no need to use excessive force. If you flip it around, you'll now see the clip holding the two pieces well together. | ||
| − | [[Fil:SMT Tool, parts joined.jpg|400px|miniatyr| | + | [[Fil:SMT Tool, parts joined.jpg|400px|miniatyr|sentrer]] |
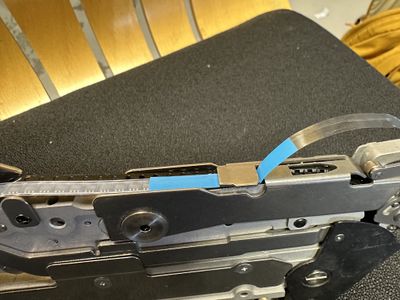
Next it's time to stick the lead-in tape. These can also be found on the shelf above the P'n'P. The sticky part goes on top of the protective tape that holds the components in place. The more precise you align this, the better. Once it's in place, peel back 4 mm of the protective tape that holds the components (at the point we just stuck the tape). this will likely make the first component fall out, but if you don't help the peeling process by doing this, it will usually get stuck in the feeder since it does not peel off. Now you should be able to put it on an empty reel (if needed) and mount it in the feeder. Pay close attention as you feed just past the splice. Be sure that the protective film is peeled off properly. | Next it's time to stick the lead-in tape. These can also be found on the shelf above the P'n'P. The sticky part goes on top of the protective tape that holds the components in place. The more precise you align this, the better. Once it's in place, peel back 4 mm of the protective tape that holds the components (at the point we just stuck the tape). this will likely make the first component fall out, but if you don't help the peeling process by doing this, it will usually get stuck in the feeder since it does not peel off. Now you should be able to put it on an empty reel (if needed) and mount it in the feeder. Pay close attention as you feed just past the splice. Be sure that the protective film is peeled off properly. | ||
| − | [[Fil:SMT Tool, splice.jpg|400px|miniatyr| | + | [[Fil:SMT Tool, splice.jpg|400px|miniatyr|sentrer]] |
Revisjonen fra 2. nov. 2022 kl. 12:24
This is the process for making your own reels using the SMT Splice Tool purchased from AllSMT. You'll use similar gear in the same way. This allows you to add lead-in
Start by getting the special plier tool and the clips from the shelf above the [Pick_and_place] machine. Open the tool and put a metal clip so the holes align up as in the picture. If you feel the clip, it has small and sharp protrusions sticking out on once side. Make sure these align to the top and the smooth side down. These will press into the holes on the reel pieces we are joining.
Next, add the component cut-off that you want to join/extend to the left side of the tool. Center it as well as as doable (given the holes) and twist the black plastic thing to hold it in place.
Now you can head over to the [Pick_and_place] machine with some pliers and look for a piece of empty reel with the same dimensions that you have. Formerly we just threw these in the bin, not now they are great for just this process. Cut off 20-30cm and add it to the tool on the right side. The better the alignment with the component cutoff - the less hassle when putting this in the feeder. When you're happy - twist the black plastic piece on this side also to hold it in place.
If it looks good, press the pliers well together but there is no need to use excessive force. If you flip it around, you'll now see the clip holding the two pieces well together.
Next it's time to stick the lead-in tape. These can also be found on the shelf above the P'n'P. The sticky part goes on top of the protective tape that holds the components in place. The more precise you align this, the better. Once it's in place, peel back 4 mm of the protective tape that holds the components (at the point we just stuck the tape). this will likely make the first component fall out, but if you don't help the peeling process by doing this, it will usually get stuck in the feeder since it does not peel off. Now you should be able to put it on an empty reel (if needed) and mount it in the feeder. Pay close attention as you feed just past the splice. Be sure that the protective film is peeled off properly.
