Forskjell mellom versjoner av «How to configure Cura for upgraded ultimakers»
(→Enter NEW Settings) |
|||
| (6 mellomliggende revisjoner av 2 brukere er ikke vist) | |||
| Linje 1: | Linje 1: | ||
| − | This | + | This will be a tutorial on how to set up Cura for the Upgraded Ultimaker(s) |
== Whats going on? == | == Whats going on? == | ||
| Linje 41: | Linje 41: | ||
Also check that you have Heated Bed selected under "Printer Settings" on the left.Compare your settings to this image. | Also check that you have Heated Bed selected under "Printer Settings" on the left.Compare your settings to this image. | ||
[[Fil:CustomMachineSettings.png|600px]] | [[Fil:CustomMachineSettings.png|600px]] | ||
| + | |||
| + | === Step 4 - Advanced Settings === | ||
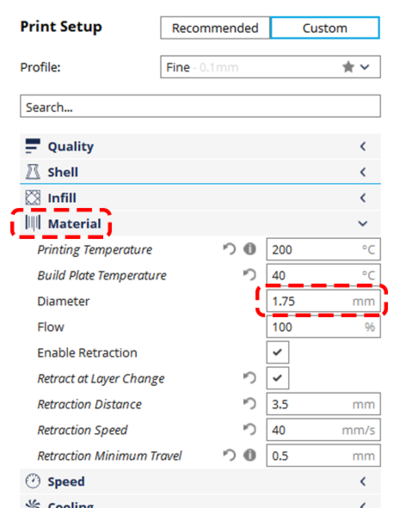
| + | This step is potentially optional for some people, but if you use custom settings in Cura, you need to make sure this setting is also changed. Under customs settings on the right, go down to where is says Material and change the Diameter to 1.75. If you cannot see this option you don't need to worry, Cura is using the Machine settings as default which we set up in the previous steps. If you see more more or less options in the image than you have on your screen you don't have to worry. Those are options you have to manually enable. Stay away from this if you're still a novice 3D Printer. | ||
| + | [[Fil:AdvancedSettings.png|400px]] | ||
| + | |||
| + | === CONGRATULATIONS!!! === | ||
| + | You should now be set up and ready to print as normally. Make sure to use the printer profile you just set up if you're going to print on the upgraded ultimakers. You cannot use this profile for the standard ultimakers. | ||
| + | |||
| + | === What hardware has is now on the printer? === | ||
| + | The Hot end, which is the part that melts the plastic, has been upgraded to a genuine E3D v6 all metal hot end. Here is a link to its product page: https://e3d-online.com/v6 | ||
| + | |||
| + | The Extruder has been upgraded to the E3D Titan extruder. Similarly to the Ultimaker Extruder is geared and has a wheel you can turn to manually feed filament. The advantage is that its a much smaller package and its made out of injection molded parts. Its also very easy to buy upgrades or replacements. Here is a link to the product: https://e3d-online.com/titan-extruder | ||
| + | |||
| + | ==== Printed Parts ==== | ||
| + | The printed parts used to attach the hotend to the ultimaker is models provided by E3D. They were part of an Upgrade kit made for the Ultimaker 2. They parts work for the Ultimaker Original as well. If any of these parts need to be replaced you can find them here: https://www.thingiverse.com/thing:1934309 | ||
| + | |||
| + | ==== Electrical ==== | ||
| + | The Print cooling fans are connected to the original fan connector on the ultimaker and they are wired in parallel. However the fan for the hot end cooling is wired to a 19v LED output on the control board. In order to step down to the correct voltage we wired three 180 ohm resistors in parallel with the positive side. This steps the voltage down to the appropriate 12v needed for the fan. | ||
| + | |||
| + | Some important info | ||
| + | We have re-used the heater cartridge and heat sensor from the original ultimaker. The heater cartridge that ships with the E3D is not compatible. If we need to replace the head sensor you can buy the PT100 from E3D here: https://e3d-online.com/pt100-sensor-cartridge | ||
| + | |||
| + | === Where can i buy compatible plastic? === | ||
| + | http://www.3DNet.no/ has a store at Frysja in Oslo where you can buy 1.75mm filament. | ||
| + | If you're looking for some slightly prettier materials i suggest Fillamentum PLA which can be bought from [https://www.e3printable.no/nettbutikk-norge/?search=Fillamentum#!?filter=%7B%22data%22:%7B%22c_6%22:%5B%22c%7C6%7CPLA%7C0%22,%22c%7C6%7CWood%7C0%22%5D%7D,%22lastUpdated%22:%22c_6%22%7D E3Printable.no] or directly from the manufacturer in the Czech Republic from here: https://fillamentum.com/collections/pla-extrafill | ||
| + | |||
| + | [[Category:3D Printer]] [[Category:Ultimaker]] [[Category:Programvare]] [[Category:Cura]] | ||
Nåværende revisjon fra 14. jan. 2018 kl. 00:51
This will be a tutorial on how to set up Cura for the Upgraded Ultimaker(s)
Innhold
Whats going on?
I, Chrankus, just upgraded one of the ultimakers with a new all metal Hotend. This replaces the standard PEEK hotend that is standard on the ultimaker. It was the cause of a lot of headache for many users of the 3D printers. This upgrade should make the printer more robust and will be easier to repair and maintain. Currently only one of the Ultimakers have been upgraded, but we will be upgrading the rest in the near future.
This switch also means that all our current filament will be incompatible with the upgraded ultimakers. However it also means you(advanced users) will be able to use more exotic materials and a wider array of normal materials.
"Great, what do i need to change?"
With this upgrade we are switching from 2.85(3mm) filament to 1.75mm filament. This means that you have to tell cura that you're using a different filament diameter. If you do not change this you will extrude too little filament and your prints will fail.
Step 1 - Download/Upgrade Cura
Make sure you upgrade to the latest version of Cura from here: https://ultimaker.com/en/products/ultimaker-cura-software
This tutorial will be for Cura 3.0, but should work for newer and older versions.
Step 2 - Choose correct machine type
The first time you open cura you should be prompted with this window.
Choose "Ultimaker Original" from the list and give the machine a name.
I suggest "Ultimaker Bitraf E3D 1.75". Finish by pressing the "Add Printer" button.
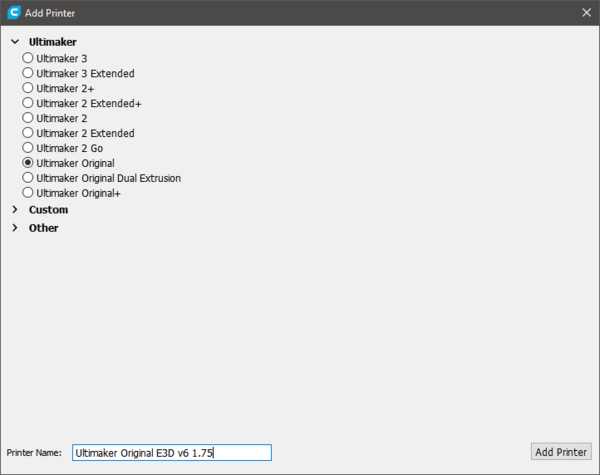
"I DONT HAVE THAT WINDOW WHAT DO I DO???"
Relax, if you have Cura installed previously you might not get prompted with that window.
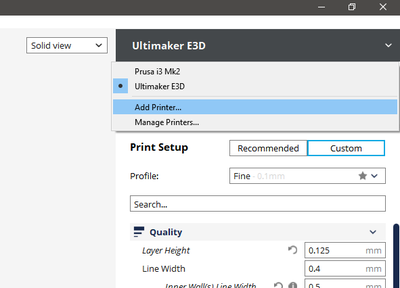
If this is the case, simply click the black bar to the top right on your screen and press "Add Printer".
Step 3 - Configure Printer
We now need to manually change the machine settings of this default Ultimaker Original Profile. Reference the second image in the last step and click "Manage Printers" instead of Add printer.
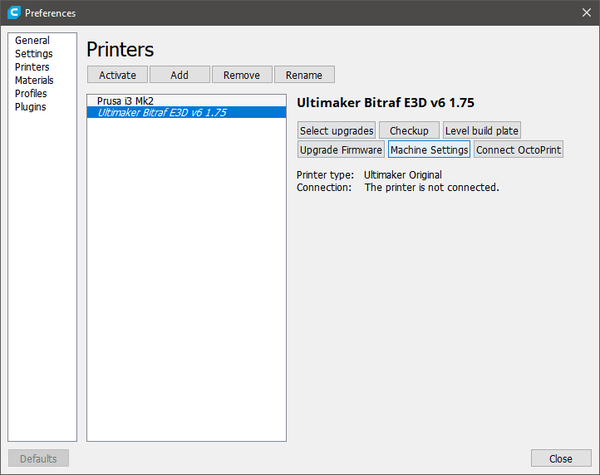
In this new window, select the machine we just added(It should already be selected) and on the right click "Machine Settings".
Enter NEW Settings
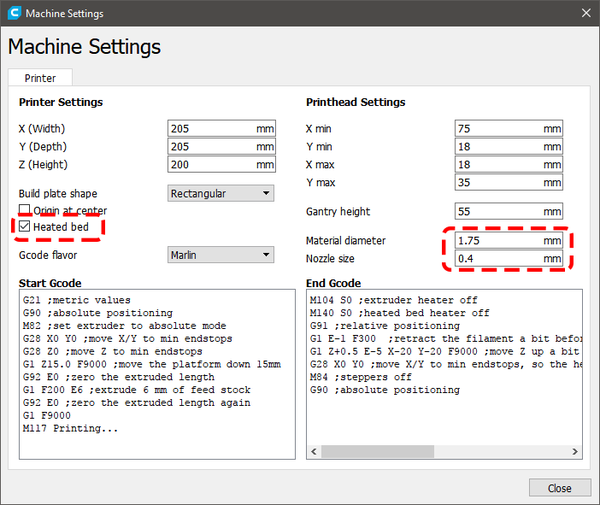
In this window, under "Printhead Settings", Change the Material Diameter to 1.75.
Also check that you have Heated Bed selected under "Printer Settings" on the left.Compare your settings to this image.
Step 4 - Advanced Settings
This step is potentially optional for some people, but if you use custom settings in Cura, you need to make sure this setting is also changed. Under customs settings on the right, go down to where is says Material and change the Diameter to 1.75. If you cannot see this option you don't need to worry, Cura is using the Machine settings as default which we set up in the previous steps. If you see more more or less options in the image than you have on your screen you don't have to worry. Those are options you have to manually enable. Stay away from this if you're still a novice 3D Printer.
CONGRATULATIONS!!!
You should now be set up and ready to print as normally. Make sure to use the printer profile you just set up if you're going to print on the upgraded ultimakers. You cannot use this profile for the standard ultimakers.
What hardware has is now on the printer?
The Hot end, which is the part that melts the plastic, has been upgraded to a genuine E3D v6 all metal hot end. Here is a link to its product page: https://e3d-online.com/v6
The Extruder has been upgraded to the E3D Titan extruder. Similarly to the Ultimaker Extruder is geared and has a wheel you can turn to manually feed filament. The advantage is that its a much smaller package and its made out of injection molded parts. Its also very easy to buy upgrades or replacements. Here is a link to the product: https://e3d-online.com/titan-extruder
Printed Parts
The printed parts used to attach the hotend to the ultimaker is models provided by E3D. They were part of an Upgrade kit made for the Ultimaker 2. They parts work for the Ultimaker Original as well. If any of these parts need to be replaced you can find them here: https://www.thingiverse.com/thing:1934309
Electrical
The Print cooling fans are connected to the original fan connector on the ultimaker and they are wired in parallel. However the fan for the hot end cooling is wired to a 19v LED output on the control board. In order to step down to the correct voltage we wired three 180 ohm resistors in parallel with the positive side. This steps the voltage down to the appropriate 12v needed for the fan.
Some important info We have re-used the heater cartridge and heat sensor from the original ultimaker. The heater cartridge that ships with the E3D is not compatible. If we need to replace the head sensor you can buy the PT100 from E3D here: https://e3d-online.com/pt100-sensor-cartridge
Where can i buy compatible plastic?
http://www.3DNet.no/ has a store at Frysja in Oslo where you can buy 1.75mm filament. If you're looking for some slightly prettier materials i suggest Fillamentum PLA which can be bought from E3Printable.no or directly from the manufacturer in the Czech Republic from here: https://fillamentum.com/collections/pla-extrafill