Forskjell mellom versjoner av «ShopBot»
m (fikset div skrivefeil) |
|||
| (86 mellomliggende revisjoner av 9 brukere er ikke vist) | |||
| Linje 1: | Linje 1: | ||
| + | {{Infobox cnc machine | ||
| + | | name = ShopBot | ||
| + | | location = i eget rom i verkstedet | ||
| + | | workarea = 2440 x 1220 x ??? mm | ||
| + | }} | ||
| + | {{Infobox ehs summary | ||
| + | | name = Shopbot | ||
| + | | hazards_1 = Kuttskade | ||
| + | | hazards_2 = Brann | ||
| + | | ppe_1 = Vernebriller | ||
| + | | ppe_2 = Hørselsvern | ||
| + | | training_1 = Shopbot-kurs, teoridel | ||
| + | | training_2 = Shopbot-kurs, praksisdel | ||
| + | | ehs_last_revision = 2018-12-06 | ||
| + | }} | ||
| + | == Announcements == | ||
| + | |||
| + | {{Infoboxround|color=Orange|text= | ||
| + | |||
| + | '''NEW: May 02, 2023 - Send a Shopbot status report on #cnc at Slack when you are done.''' | ||
| + | |||
| + | Example: I'm finished with the Shopbot now and all went well. | ||
| + | |||
| + | Report any incident. We understand that things do happen but we need to know so we can perform adjustments or repairs. | ||
| + | |||
| + | * If the ShopBot was not properly cleaned by previous user | ||
| + | * Problems with the machine or any unusual occurence | ||
| + | * Damaged collets or nuts | ||
| + | * Spindle crashes | ||
| + | * Accidental spoilboard cuts deeper than 0.4mm (Fine 100 NOK per mm below this) | ||
| + | * Any stuck fasteners you are unable to remove yourself. | ||
| + | |||
| + | }} | ||
| + | |||
| + | {{Infoboxround|color=Orange|text= | ||
| + | '''NEW: April 26, 2023''' | ||
| + | |||
| + | * Bitraf no longer provides collets or collet-nuts for community use. Buy your own in bitmart | ||
| + | * Automatic Z probe is out of order. Use manual probe (ask at #cnc if you need help) | ||
| + | |||
| + | }} | ||
| + | |||
| + | {{Infoboxround|color=Orange|text= | ||
| + | '''ShopBot rules - last updated May 02, 2023''' | ||
| + | |||
| + | * Current limit for spoilboard cutting is '''0.4mm''' | ||
| + | * Use of lubrication requires prior approval from a ShopBot admin, and using personal collets and nuts is required. | ||
| + | * Allowed materials | ||
| + | ** Wood (solid, mdf, plywood etc) | ||
| + | ** Plastic | ||
| + | ** Aluminium | ||
| + | ** Foam | ||
| + | * Send a post work report on Slack #cnc when you are finished | ||
| + | |||
| + | '''Current passcode: 20230606''' | ||
| + | |||
| + | }} | ||
| + | |||
== Generelt == | == Generelt == | ||
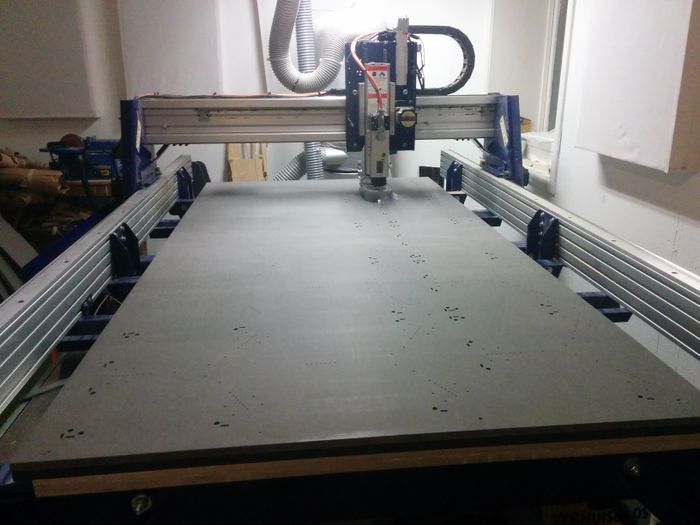
| − | + | Bitraf has a Shopbot PRSalpha 96x48x8 CNC machine available for all members. | |
| − | + | It's an awesome machine and we encourage everyone to use it and learn how it can be operated. It is required to attend a safety cource before you can operate it alone and you must receive assistance from an experienced user the first few times you use it. Stay updated on upcoming courses at [https://www.meetup.com/bitraf/ Meetupgruppe] | |
| + | If it's been a while since you used the machine make sure you refresh your knowledge of proper use. Most of the damages and mishaps are caused by user error. | ||
| + | |||
| + | == Rules for use == | ||
| + | |||
| + | * '''Always use the machine in accordance with the latest operating instructions. They have most likely changed since you took the course''' | ||
| + | * '''You are responsible to repair and pay for any damage caused by incorrect use''' | ||
| + | * '''You are required to understand your toolpath before milling. Trial and error without simulation and validation is not acceptable. Ask for help if uncertain''' | ||
| + | * '''Ask for help if you are uncertain about something.''' | ||
| + | |||
| + | Don't be afraid to ask for help. Post questions and ask for advice on Slack at the #cnc channel. | ||
| + | |||
| + | === Allowed materials === | ||
| + | * Wood | ||
| + | * Plastic | ||
| + | * Aluminium | ||
| + | |||
| + | === Lubrication === | ||
| + | Lubrication is generally not allowed. If you want to use lubrication please contact a Shopbot admin | ||
| + | |||
| + | * Always use personal collets and collet nuts | ||
| + | * Use a temporary sheet or material over the spoilboard. Cover up unused parts of the spoilboard with plastic or other suitable material. | ||
| + | * Thoroughly clean the machine after use. There should not be any lubrication residue anywhere | ||
| + | * Remove dust skirt completely | ||
| + | |||
| + | === Spoilboard cut depths === | ||
| + | * Maximum cut depth in spoilboard is 0.4mm. Fine 100 NOK per mm below this, minium 100 NOK. | ||
| + | |||
| + | Any deviations from the above rules needs agreement from at least TWO Shopbot admins. | ||
| + | |||
| + | |||
| + | == Praktisk == | ||
=== Booking === | === Booking === | ||
| − | + | Prior to use the machine must be reserved in the [[Booking|Bitraf booking system]] . | |
| − | • | + | • The shopbot can be pre-booked free of charge for a maximum of 12 hours during a 4-week period<br /> |
| − | • For | + | • For all bookings lasting more than 4 hours, the reason for the long milling time must be explained in the description in the calendar.<br /> |
| − | • | + | • Bookings at night between 01.00 and 07.00 are not included in counting hours.<br /> |
| − | • | + | • Bookings made less than 72 hours in advance are not included in counting hours. These bookings are marked with "SHORT TIME / KORTTID" in the calendar.<br /> |
| − | • | + | • Commercial and paid bookings are not included in counting hours. These bookings are marked with "PAID/BETALT" in the calendar.<br /> |
| − | • For | + | • For maintenance, courses and other common benefits, you can mark bookings with "BITRAF". These are not included in counted hours.<br /> |
| Linje 29: | Linje 118: | ||
Dersom man gjør *kommersielle jobber* betaler man 350 NOK/time (+moms) for bruk av Shopbot. | Dersom man gjør *kommersielle jobber* betaler man 350 NOK/time (+moms) for bruk av Shopbot. | ||
| − | Kommersiell jobb er en jobb hvor man enten får betalt for å lage noe eller gjør produksjon av noe man selger selv. Dette bidrar til kostnadene ved vedlikehold, samt for å ikke urettferdig konkurrere med andre som leverer tjenester | + | Kommersiell jobb er en jobb hvor man enten får betalt for å lage noe eller gjør produksjon av noe man selger selv. Dette bidrar til kostnadene ved vedlikehold, samt for å ikke urettferdig konkurrere med andre som leverer CNC tjenester, og at ikke bruken blir monopolisert av noen enkelte som driver gratis masseproduksjon. |
| − | Kommersiell bruk betales normalt i Bitmart med kort. Legg inn epost så får du kvittering på epost. | + | Kommersiell bruk betales normalt i [[Bitmart]] med kort. Legg inn epost så får du kvittering på epost. |
Dersom du trenger en faktura, kan du istedet skriv en epost til "kasserer (at] bitraf.no" og spesifiser antall timer bruk og dato. | Dersom du trenger en faktura, kan du istedet skriv en epost til "kasserer (at] bitraf.no" og spesifiser antall timer bruk og dato. | ||
| + | |||
| + | |||
| + | === Common problems === | ||
| + | |||
| + | * Be certain that you understand your toolpath. It can be simulated in the shopbot application. Deep cuts in the spoilboard is always user error. | ||
| + | * Fasten the tool correctly in the collet. Incorrect fastening causes tool to slip and damages spoilboard and material. | ||
| + | * Use screws with heads in good condition. Broken screws are often the cause of spoilboard damage and damaged screw head makes them difficult to remove. | ||
=== Om maskinen === | === Om maskinen === | ||
| Linje 46: | Linje 142: | ||
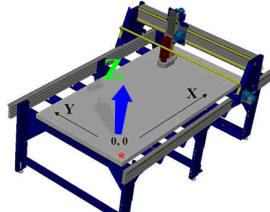
[[File:xyz2.jpg|400px]] | [[File:xyz2.jpg|400px]] | ||
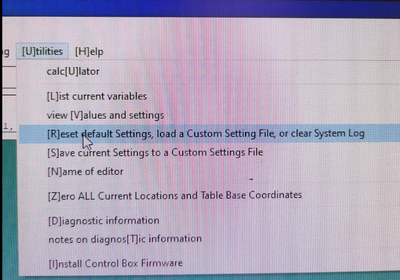
| − | == | + | == Start shopbot application and reset default Settings == |
| − | + | The shopbot application must always be restarted when you start using the machine. If the last user forgot to end the application you must close it and start it again. Not running bitraf default settings can cause damage to the machine. | |
| − | + | Procedure: | |
| + | |||
| + | * If shopbot application is running, close it | ||
| + | * Start the shopbot application by using the shortcut on the taskbar or the desktop. | ||
| + | * Enter the current passcode. It can be found on top of this wiki. | ||
| + | * During startup you will be prompted to load new configuration settings. Press YES on the first message box and OK on the second. | ||
| + | * Choose the file called bitraf-default. Never use custom configuration without approval from a ShopBot administrator. | ||
| + | |||
| + | [[Fil:Reset.png|sentrer|400px]] | ||
| + | |||
| + | |||
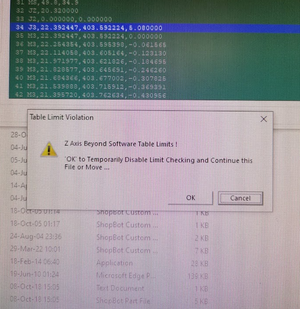
| + | == Table limit violation warning / Z axis beyond software table limits== | ||
| + | |||
| + | When Z axis is correctly calibrated the ShopBot application produces an error message warning when you attempt to move the tool deeper than 0.4 mm into the spoilboard. This warning only works after correct Z axis calibration with correct stock size input. | ||
| + | |||
| + | '''WARNING: Never press OK on this warning. Check your toolpath or recalibrate Z axis. This will damage the spoilboard and you are responsible for repair and costs for new spoilboard!''' | ||
| + | |||
| + | [[Fil:Z limit.png|miniatyr|sentrer]] | ||
| + | |||
| + | == Spindle warmup == | ||
| + | |||
| + | Applying load to a cold spindle will cause premature failure of bearings. Always run the spindle warmup routine before milling. This allows bearings, supports and shaft to reach their designed dimensions. | ||
| + | |||
| + | Failure to run the spindle warmup causes excessive wear and damages the spindle. | ||
| + | |||
| + | Procedure: | ||
| + | |||
| + | * Fit the spindle nut wrench on the control box. | ||
| + | * Start the spindle warmup routine by selecting "Spindle warmup" under "Cuts" in the ShopBot software. It takes around 9 minutes and stops by itself when finished. | ||
== Bytte av bit == | == Bytte av bit == | ||
| Linje 62: | Linje 186: | ||
[[File:C1.jpg|400px]] | [[File:C1.jpg|400px]] | ||
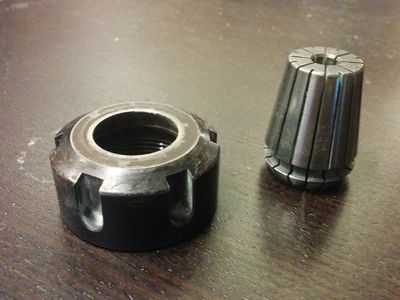
| − | Det ligger collets i forskjellige størrelser | + | Collets og collet-nut er slitedeler og kan kjøpes i bitmart. Det ligger noen collets og nuts i forskjellige størrelser ved maskinen, disse er av ukjent kvalitet. Husk å rengjøre støv og spon fra collet'en. TIPS: Bruk trykkluften på maskinen |
Det er VELDIG viktig at man kalibrerer Z-aksen på nytt hver gang man bytter drillbit. | Det er VELDIG viktig at man kalibrerer Z-aksen på nytt hver gang man bytter drillbit. | ||
| + | |||
| + | |||
| + | == Bytte av Støvskjørt == | ||
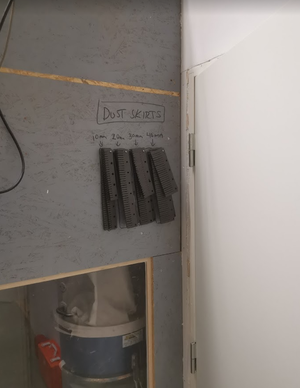
| + | Før beste resultat fra støvutsuget skall riktig lengde støvskjørt brukes. | ||
| + | det henger ulike lengder skjørt utenfor Shopbot rommet. | ||
| + | [[Fil:Dust.png|miniatyr|sentrer]] | ||
| + | skjøtrt monteres uten vektøy. | ||
| + | |||
| + | [[Fil:Dustballpa.png|miniatyr|sentrer]] | ||
| + | |||
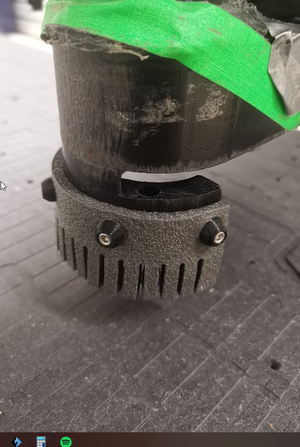
| + | press på skjørt på ballene. | ||
== Kalibrering == | == Kalibrering == | ||
| + | |||
=== X og Y aksene === | === X og Y aksene === | ||
| Linje 84: | Linje 220: | ||
== Software == | == Software == | ||
| − | + | ===V-carve=== | |
| − | [[VCarve|Les mer om VCarve på egen wiki-page]] | + | [[VCarve|Les mer om VCarve på egen bitraf wiki-page]] |
| + | |||
| + | Datamaskinen ved siden av fresen har VCarve for å lage verktøybaner og ShopBot kontrollprogram for å styre fresen. Detta er det mest nybegynnervennlige. | ||
* [https://docs.google.com/presentation/d/1yE2ZAthcDL0GUp_6uIqDUKWAdFcZyrXJJtVbfx651mk/edit?usp=sharing Bitrafs Vcarve kursmaterial] | * [https://docs.google.com/presentation/d/1yE2ZAthcDL0GUp_6uIqDUKWAdFcZyrXJJtVbfx651mk/edit?usp=sharing Bitrafs Vcarve kursmaterial] | ||
| − | + | Obs: Lisensmodellen til VCarve tillater ikke at man lager klar verktøybaner på en annen maskin hvor bare trial-versjon er installert. Man må gjøre klar filene på en maskin som har fullversjon av VCarve installert. Vi har tre maskiner med fullversion stående på Bitraf. | |
| + | ===Fusion 360=== | ||
| + | Fusion 360 fra Autodesk kan også brukes, både til design og for å lage verktøybaner. Fusion 360 er litt mer avansert, men har også flere funksjoner og mer detaljkontroll. | ||
| − | + | [[Fusion 360|Les mer om Fusion360 på egen wiki-page]] | |
| + | |||
| + | ===Shopbot control=== | ||
Ved oppstart av ShopBotsoftware vil man få beskjed om å resette maskinen. Det gjøres med bryter rett over nødstoppen. | Ved oppstart av ShopBotsoftware vil man få beskjed om å resette maskinen. Det gjøres med bryter rett over nødstoppen. | ||
| Linje 106: | Linje 248: | ||
Innstillinger for feeds, speeds osv for forskjellige materialer. | Innstillinger for feeds, speeds osv for forskjellige materialer. | ||
| − | + | ===Vcarve tool library=== | |
| − | [https:// | + | Standard tool library før Vcarve och Shopbot lagt av Jens Dyvik med [https://github.com/fellesverkstedet/Bark-beetle-parametric-toolpaths Bark beetle] |
| + | |||
| + | Last ned och importera till Vcarve: | ||
| + | [https://github.com/Jaknil/CNC_resources/raw/master/vcarve-tool-library-with-shopbot-defaults-from-jens.tool vcarve-tool-library-with-shopbot-defaults-from-jens.tool] | ||
| + | eller Fellesverkstedets V-carve tool library som har flere bits og material: | ||
| + | [https://github.com/fellesverkstedet/workshop-wiki/raw/master/Images%20for%20wiki/Shopbot/File%20prep/201027%20Fellesverkstedet%20Vcarve%20tool%20Database.vtdb fellesverkstedets tool library] | ||
| + | |||
| + | [[VCarve|Mer om Vcarve]] | ||
| − | + | ===Terminologi=== | |
* Up-Cut single-flute = Ett fresestål som trekker sponen uppåt, och som har en spånkanal (flute). | * Up-Cut single-flute = Ett fresestål som trekker sponen uppåt, och som har en spånkanal (flute). | ||
* Feed rate = Hur raskt fresen beveger sig horizontellt. | * Feed rate = Hur raskt fresen beveger sig horizontellt. | ||
| Linje 120: | Linje 269: | ||
'''Feed rate'''. Grunnen er at om du kjører for sakte så dannes det for mye varme pga friksjon! | '''Feed rate'''. Grunnen er at om du kjører for sakte så dannes det for mye varme pga friksjon! | ||
| + | ===Safe settings=== | ||
;Treverk (alle sorter) | ;Treverk (alle sorter) | ||
* 6mm Up-Cut single-flute: Feed rate 30mm/s, plunge rate 30mm/s, Spindle RPM 18000, pass depth '''19.6mm''' (OBS! Kolla att du har lang nok egg på fresestålet), ramp angle 45deg | * 6mm Up-Cut single-flute: Feed rate 30mm/s, plunge rate 30mm/s, Spindle RPM 18000, pass depth '''19.6mm''' (OBS! Kolla att du har lang nok egg på fresestålet), ramp angle 45deg | ||
| Linje 134: | Linje 284: | ||
* 6mm Up-Cut single-flute: Feed rate 22mm/s, plunge rate 15mm/s, Spindle RPM 18000, pass depth 8mm, ramp angle 18deg | * 6mm Up-Cut single-flute: Feed rate 22mm/s, plunge rate 15mm/s, Spindle RPM 18000, pass depth 8mm, ramp angle 18deg | ||
* 3mm Up-Cut single-flute: Feed rate 18mm/s, plunge rate 12mm/s, Spindle RPM 18000, pass depth 4mm, ramp angle 18deg | * 3mm Up-Cut single-flute: Feed rate 18mm/s, plunge rate 12mm/s, Spindle RPM 18000, pass depth 4mm, ramp angle 18deg | ||
| + | |||
| + | ;Safe settings spreadsheet, extern lenke: | ||
| + | [https://docs.google.com/spreadsheets/d/1CIeq0kdHTtytup34hbbG6PKpkgCj6JNE37Xee9nRBrM/edit?usp=sharing Feeds and speeds spreadsheet før bitrafs shopbot] | ||
| + | |||
| + | == Spoilboard == | ||
| + | |||
| + | The spoilboard sacrificial layer is a MDF/HDF valchromat surface used to fasten stock to the machine before milling. | ||
| + | |||
| + | '''Never cut deeper than 0.4 mm into the spoilboard. You are responsible to repair and pay for deeper spoilboard cuts. Fine 100 NOK per mm below this, minium 100 NOK. | ||
| + | ''' | ||
| + | |||
| + | Direct fastening to the sacrificial layer must only be done with removable screws. Any other fastening methods like glue / tape etc are not allowed directly on the spoilboard. | ||
| + | |||
| + | The surface gets worn over time and requires maintenance by regular flattening / resurfacing. If it’s in bad condition please send a notification to #cnc at Slack for instructions or help on resurfacing procedure. | ||
| + | |||
| + | It is important to remove any fasteners that get stuck in the spoilboard after every use of the shopbot. During resurfacing any stuck metal parts destroys the planing tool and inflicts unnecessary costs for Bitraf. | ||
| + | |||
| + | * Never use glue / tape / adhesives directly on the spoilboard | ||
| + | * Only use removable screws when fastening stock. | ||
| + | * Avoid screws close to edges where the board can easily fracture | ||
| + | * Always remove all fasteners in the spoilboard. If you break a screw it must be dug up and completly removed. | ||
| + | |||
| + | |||
== Klar for fresing? == | == Klar for fresing? == | ||
| Linje 147: | Linje 320: | ||
Obs - gjør deg kjent med hvor brannslukkingsapparat er før du starter! | Obs - gjør deg kjent med hvor brannslukkingsapparat er før du starter! | ||
| − | [[File: | + | == Cleaning and end procedure == |
| + | |||
| + | Always leave the machine in the same or better condition after you have finished your work. If the machine is in bad condition / dirty / has faults report it to #cnc at slack. | ||
| + | |||
| + | * General | ||
| + | |||
| + | # Put all parts back in it's proper location. If something is missing or broken report it to #cnc at Slack | ||
| + | # Lock the padlock | ||
| + | # Put key back and remember to check out the tool | ||
| + | # Exit the shopbot application on the computer. | ||
| + | |||
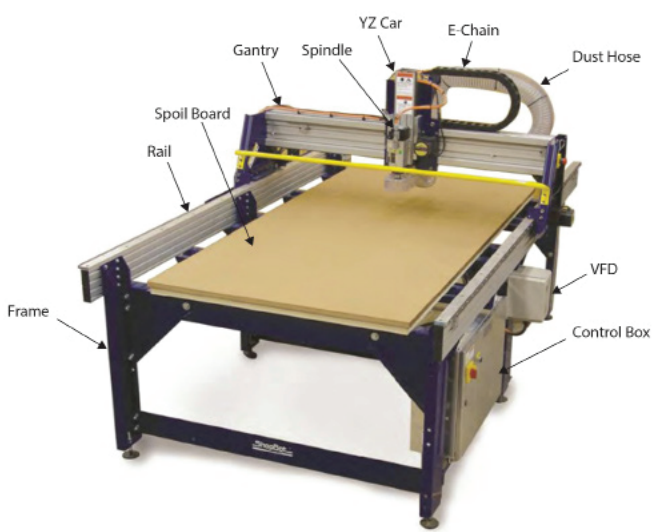
| + | [[Fil:Shopbot parts overview.png|Shopbot parts]] | ||
| + | |||
| + | |||
| + | * Vacuum the machine in general, use the checklist after general cleaning. | ||
| + | |||
| + | # Gantry - cables and E-chain | ||
| + | # Rail - vertical slots | ||
| + | # Spindle and dust foot and skirt often has leftover residue, shake the dust hose while running the dust extraction vacuum. Aluminium milling is especially prone to this | ||
| + | # Control box and VFD - horizontal top surface | ||
| + | # Frame - horizontal lower L bars, vertical angle triangle support, inside vertical support feet | ||
| + | # Clean all collets and nuts before putting them back. Remove all stuck bits and dust. If using the high pressure air make sure you hold the collet/nut firmly to avoid it from flying away. | ||
| + | |||
| + | * Spoilboard | ||
| + | |||
| + | # Remove all dust with horizontal roller brush | ||
| + | # Remove brush and use hose end directly on residue stuck in cavities | ||
| + | # Point the compressed air from the spindle nozzle to remove stuck chips | ||
| + | # If you find any broken screws report it to #cnc at Slack immediately | ||
| + | |||
| + | NOTE: After milling aluminium it's especially important to remove residue. It's impossible to inspect the spoilboard for leftover steel screws before resurfacing when metal part residue are everywhere, this damages bitrafs expensive surface bits. TIP: Cover up the parts of the spoilboard you are not using when milling aluminium to reduce cleanup time. | ||
| + | |||
| + | == Punktliste for fresingen == | ||
| + | Dette er en ikke utfyllende, steg for steg-oppskrift, skrevet ned etter et kurs. | ||
| + | Shopbot, veileder | ||
| + | # Sjekke ut nøkkel i tools | ||
| + | # Sjekke sikkerhetsverktøyet | ||
| + | # Sjekk støvsuger | ||
| + | # Skru på maskinen med hovedbryteren på kontrollboksen ved siden av shopboten (hengelås åpnes med nøkkel fra tools) | ||
| + | # Sette på bit i collet, sjekk for støv og flis | ||
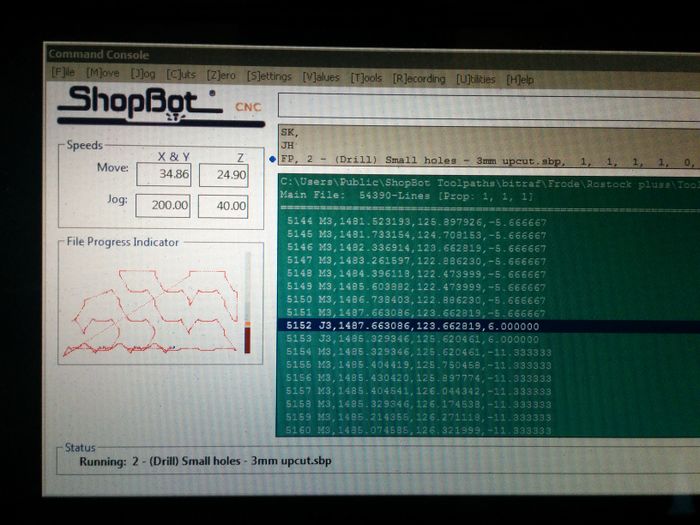
| + | # Skru på Shopbots kontrollsoftware | ||
| + | # Trykk Ok, så den blå Resett-knappen på veggen slukker lampe nr 4 | ||
| + | # Reset default settings i Utilities menyen | ||
| + | # Home X,Y aksen med automatisk med proximity switches, '''C3''' | ||
| + | # Flytt maskinen til toolchange position '''C1'''. Evt bruk for keyboard '''K''' (for å kjøre) piltaster for xy, pg up dwn for z. | ||
| + | # Sett bit og collet i spindelen, stram til | ||
| + | # Sett strammeverktøy i nøkkel på siden og vri ned | ||
| + | # Kjør warmup spindel-rutine '''C5''' | ||
| + | # Legg i materialet | ||
| + | # Fest med clamps | ||
| + | # Kjør til stabilt underlag og legg under kalibreringsplaten, kommando '''C2'''. Klem kalibreringsplaten ned mens du kjører kalibreringen, hold fingrene i god avstand fra biten | ||
| + | # Set ev egen origo med med K og "zero axis" - blå knapp. Pass på å ikke resette Z aksen. Den bør kun settes ved kalibrering og ikke manuelt. | ||
| + | # Sett på støvhette | ||
| + | # Lukk dører og vindu | ||
| + | # File load ev. Cut part | ||
| + | # Start | ||
| + | # Spindel starter automatisk, Vær sikker på at spindel har startet. | ||
| + | # Start støvsuger | ||
| + | # Trykk OK, og vent til ferdig. Trykk Mellomrom på tastaturet for soft stop. | ||
| + | # Fortsett med evt flere filer med Cut part igjen. | ||
| + | |||
| + | Støvsug og rydd. Det skal være ryddigere enn når du overtok rommet. | ||
| + | |||
| + | == Fikse problemer == | ||
| + | |||
| + | |||
| + | === Feilmelding om Software table limits violations === | ||
| + | |||
| + | Denne feilmeldingen kommer når man forsøker å flytte spindelen utenfor eller ned i offerplata. Begrensningene er definert på hver akse (X, Y, Z) | ||
| + | |||
| + | '''Feilmeldingen oppstår ved keyboard navigation:''' | ||
| + | |||
| + | Når maskinen startes opp vet den ikke hvor spindelen befinner seg i forhold til offerplata. Feilen oppstårDen kan oppstå på alle aksene (X, Y og Z) | ||
| + | |||
| + | * Ved feilmelding om X og Y akse, kjør kommando (kommando '''C3''') for automatisk kalibrering av X, Y aksen i forhold til offerplata | ||
| + | * Ved feilmelding om Z akse, kalibrer Z aksen manuelt med (kommando '''C2''') | ||
| + | |||
| + | '''Feilmeldingen oppstår under fresing:''' | ||
| + | |||
| + | * Ved feilmelding om Z akse: Toolpathene i filen som er lastet for fresing går for dypt i offerplata. Sjekk fila. '''IKKE TRYKK OK - Det vil ødelegge offerplata''' | ||
| + | * Ved feilmelding om X eller Y akse: Toolpathene i filen som er lastet for fresing går utenfor offerplata. Dette er som regel en feil med toolpathen, men det vil ikke skade maskinen og overstyre feilmeldingen. | ||
| + | |||
| + | === Easy mode === | ||
| + | |||
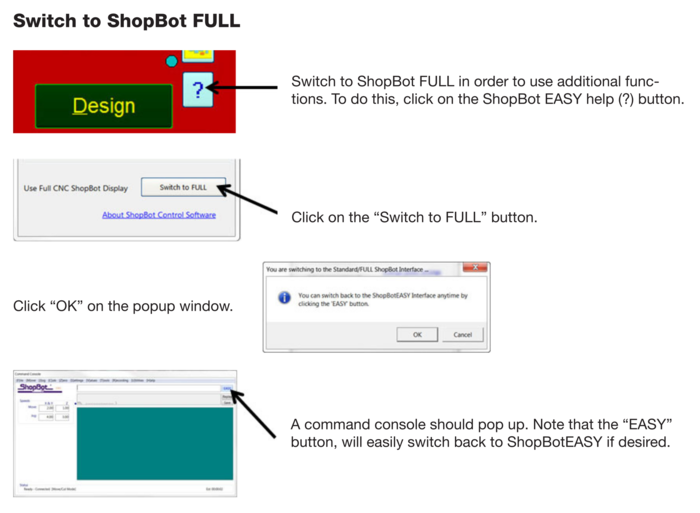
| + | Softwaren har to moduser. Easy og Full mode. For å bytte fra Easy til Full mode kan man gjøre følgende: | ||
| + | |||
| + | [[Fil:Switch to full.png|700px]] | ||
| + | |||
| + | === Parameter reset === | ||
| + | '''Hva gjør det:''' | ||
| + | Återstiller instillningerne i motordriverne i shopbot-skapet. | ||
| + | |||
| + | '''Gjør dette når:''' | ||
| + | * Shopbotten beter seg rart, rykkete bevegelser, for rast eller langsam jogging. | ||
| + | * Den gir feilmeldinger om endestopp selv om spindelen står midt på fresebordet. | ||
| + | * Andre rare feilmedlinger | ||
| + | * Etter at software har krashet | ||
| + | * Du ønsker standard-instillninger for acceleration og maxhastighet. | ||
| + | |||
| + | Da kan det være nødvendig med en parameter reset. | ||
| + | |||
| + | '''Hvordan:''' | ||
| + | I styreprogrammet ShopBot Control velg i menyen | ||
| + | * Utilities | ||
| + | * Reset Settings | ||
| + | * Load Custom | ||
| + | * '''tryck yes to ganger''' | ||
| + | * velg Bitraf Settings i mappe C:\ShopBot 3\Settings | ||
| + | |||
| + | Finner du ikke fila på shopbot PCn [https://github.com/bitraf/bitraf-cnc/blob/master/docs/shopbot/Bitraf/standardBitrafSettings.sbd så finnes backup av fila her på github] | ||
| + | |||
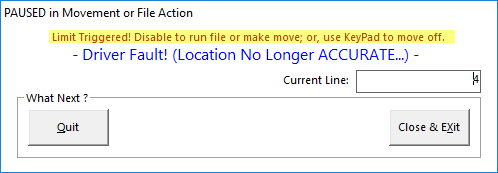
| + | === Driver Fault! (Location No Longer ACCURATE...) === | ||
| + | |||
| + | [[Fil:Shopbot-limit-triggered.png|Driver Fault! (Location No Longer ACCURATE...)]] | ||
| + | |||
| + | === Driver Fault! (Out of range...) === | ||
| + | nå man får denne melingen så stenges shopbot software ned når du trykker ok. | ||
| + | |||
| + | '''Hvordan:''' | ||
| + | Suggested solutions: | ||
| + | * Reload to default configuration file | ||
| + | * It might be stuck on an end-stop. Power the machine off and move it '''SLOWLY (MAXIMUM a few centimeters a second) - the stepper motors acts like generators and quick movement can permanently damage the machine''' manually a few cm inwards. You need to run zero routine on all axes afterwards. | ||
| + | * Other possible fixes: turn both the PC and the Shopbot completely off, start them again; PC first, wait two minutes, then Shopbot. Also try loading the settings file. All of these things might need doing several times consecutively before it works. | ||
| + | |||
| + | === DOOR! & Safety interlock = Kan inte starta spindel === | ||
| + | Om du inte kan starta spindlen och den klagar på "safety interlock" kolla att du har stengt vindu og dørrer. | ||
| + | |||
| + | === COMPUTER NOT TURNING ON AT ALL! === | ||
| + | Assuming you've checked all the usual suspects (cables, power plug, etc.) and the computer still does not turn on, try opening up the computer case and removing the battery then placing it back again. It does take quite a bit of screwing to do this, but it has become a known issue/fix as of November 2022. | ||
| + | |||
| + | You may face the next issue, so keep reading. | ||
| + | |||
| + | === Computer turns on but fails to boot === | ||
| + | If you're getting a black screen with the message '''"Reboot and Select proper Boot device ..."''', follow these steps to fix the boot settings in the BIOS: | ||
| + | * '''Restart''' the computer by pressing (and holding) the power button on the computer case | ||
| + | * As quickly as you can, press the '''magic key''' that gets us into BIOS. It's typically F1, F2, F10, F12, Delete, or Esc, but each computer is different. Until someone documents what the right key for this particualr Shopbot computer is, try running your finger from ESC to F12 in a [https://www.youtube.com/watch?v=cO2Db1mnhsU piano glissando style] while trying DEL as well. Do that until BIOS shows up. | ||
| + | * In BIOS (blue screen), use the arrow keys to navigate to the '''"Boot"''' tab | ||
| + | * Edit '''"Boot Option #1"''' and make sure the selected option is '''"Windows Boot Manager"''' | ||
| + | * Press '''"F10"''' to save and exit | ||
| + | * The computer should restart automatically and boot into Windows as intended | ||
| + | |||
| + | == For viderekommende erfarne brukere == | ||
| + | |||
| + | Maskinens innstillinger kan endres med kommandolinjen. Hvis man utfører endringer her er det viktig å alltid laste standardkonfigurasjonen når man avslutter arbeidet med maskinen. | ||
| + | |||
| + | Command refrence finnes på : https://www.shopbottools.com/ShopBotDocs/files/ComRef.pdf | ||
| + | |||
| + | === Endre jog / move speeds === | ||
| + | |||
| + | Kommando '''VS''' i kommandolinjen. Aldri gå over 400mm/s da steppermotorene kan miste steps. Det bør være raskt nok uansett. | ||
| + | |||
| + | === Override software table limits === | ||
| + | |||
| + | Det er mulig å slå av software begrensningen som gir feilmeldinger når man går utenfor X,Y og Z aksene. Det finnes få gode grunner til å gjøre dette og skal kun utføres av erfarne brukere. | ||
| − | + | Kommando '''SF''' i kommandolinjen. | |
| − | + | == Maintenance software == | |
| − | + | Passcode can be updated by editing shopbot.opt file at Program Files (x86)\ShopBot\Shopbot 3\shopbot.opt . It can also be disabled in this file. | |
Nåværende revisjon fra 27. jun. 2023 kl. 18:30
{{#invoke:Infobox|infobox}}
{{#invoke:Infobox|infobox}}
Innhold
- 1 Announcements
- 2 Generelt
- 3 Rules for use
- 4 Praktisk
- 5 Start shopbot application and reset default Settings
- 6 Table limit violation warning / Z axis beyond software table limits
- 7 Spindle warmup
- 8 Bytte av bit
- 9 Bytte av Støvskjørt
- 10 Kalibrering
- 11 Software
- 12 Innstillinger
- 13 Spoilboard
- 14 Klar for fresing?
- 15 Cleaning and end procedure
- 16 Punktliste for fresingen
- 17 Fikse problemer
- 17.1 Feilmelding om Software table limits violations
- 17.2 Easy mode
- 17.3 Parameter reset
- 17.4 Driver Fault! (Location No Longer ACCURATE...)
- 17.5 Driver Fault! (Out of range...)
- 17.6 DOOR! & Safety interlock = Kan inte starta spindel
- 17.7 COMPUTER NOT TURNING ON AT ALL!
- 17.8 Computer turns on but fails to boot
- 18 For viderekommende erfarne brukere
- 19 Maintenance software
Announcements
Generelt
Bitraf has a Shopbot PRSalpha 96x48x8 CNC machine available for all members.
It's an awesome machine and we encourage everyone to use it and learn how it can be operated. It is required to attend a safety cource before you can operate it alone and you must receive assistance from an experienced user the first few times you use it. Stay updated on upcoming courses at Meetupgruppe
If it's been a while since you used the machine make sure you refresh your knowledge of proper use. Most of the damages and mishaps are caused by user error.
Rules for use
- Always use the machine in accordance with the latest operating instructions. They have most likely changed since you took the course
- You are responsible to repair and pay for any damage caused by incorrect use
- You are required to understand your toolpath before milling. Trial and error without simulation and validation is not acceptable. Ask for help if uncertain
- Ask for help if you are uncertain about something.
Don't be afraid to ask for help. Post questions and ask for advice on Slack at the #cnc channel.
Allowed materials
- Wood
- Plastic
- Aluminium
Lubrication
Lubrication is generally not allowed. If you want to use lubrication please contact a Shopbot admin
- Always use personal collets and collet nuts
- Use a temporary sheet or material over the spoilboard. Cover up unused parts of the spoilboard with plastic or other suitable material.
- Thoroughly clean the machine after use. There should not be any lubrication residue anywhere
- Remove dust skirt completely
Spoilboard cut depths
- Maximum cut depth in spoilboard is 0.4mm. Fine 100 NOK per mm below this, minium 100 NOK.
Any deviations from the above rules needs agreement from at least TWO Shopbot admins.
Praktisk
Booking
Prior to use the machine must be reserved in the Bitraf booking system .
• The shopbot can be pre-booked free of charge for a maximum of 12 hours during a 4-week period
• For all bookings lasting more than 4 hours, the reason for the long milling time must be explained in the description in the calendar.
• Bookings at night between 01.00 and 07.00 are not included in counting hours.
• Bookings made less than 72 hours in advance are not included in counting hours. These bookings are marked with "SHORT TIME / KORTTID" in the calendar.
• Commercial and paid bookings are not included in counting hours. These bookings are marked with "PAID/BETALT" in the calendar.
• For maintenance, courses and other common benefits, you can mark bookings with "BITRAF". These are not included in counted hours.
Speedlink: Booking system
Kommersiell bruk
Dersom man gjør *kommersielle jobber* betaler man 350 NOK/time (+moms) for bruk av Shopbot. Kommersiell jobb er en jobb hvor man enten får betalt for å lage noe eller gjør produksjon av noe man selger selv. Dette bidrar til kostnadene ved vedlikehold, samt for å ikke urettferdig konkurrere med andre som leverer CNC tjenester, og at ikke bruken blir monopolisert av noen enkelte som driver gratis masseproduksjon.
Kommersiell bruk betales normalt i Bitmart med kort. Legg inn epost så får du kvittering på epost. Dersom du trenger en faktura, kan du istedet skriv en epost til "kasserer (at] bitraf.no" og spesifiser antall timer bruk og dato.
Common problems
- Be certain that you understand your toolpath. It can be simulated in the shopbot application. Deep cuts in the spoilboard is always user error.
- Fasten the tool correctly in the collet. Incorrect fastening causes tool to slip and damages spoilboard and material.
- Use screws with heads in good condition. Broken screws are often the cause of spoilboard damage and damaged screw head makes them difficult to remove.
Om maskinen
CNCfresen har et arbeidsområde på 2440mm x 1220mm.
- Nullpunktet for X og Y aksene er hjørnet som er nærmest døren.
- X-aksen går langs med veggen.
- Y aksen er langs kortsiden av bordet.
Start shopbot application and reset default Settings
The shopbot application must always be restarted when you start using the machine. If the last user forgot to end the application you must close it and start it again. Not running bitraf default settings can cause damage to the machine.
Procedure:
- If shopbot application is running, close it
- Start the shopbot application by using the shortcut on the taskbar or the desktop.
- Enter the current passcode. It can be found on top of this wiki.
- During startup you will be prompted to load new configuration settings. Press YES on the first message box and OK on the second.
- Choose the file called bitraf-default. Never use custom configuration without approval from a ShopBot administrator.
Table limit violation warning / Z axis beyond software table limits
When Z axis is correctly calibrated the ShopBot application produces an error message warning when you attempt to move the tool deeper than 0.4 mm into the spoilboard. This warning only works after correct Z axis calibration with correct stock size input.
WARNING: Never press OK on this warning. Check your toolpath or recalibrate Z axis. This will damage the spoilboard and you are responsible for repair and costs for new spoilboard!
Spindle warmup
Applying load to a cold spindle will cause premature failure of bearings. Always run the spindle warmup routine before milling. This allows bearings, supports and shaft to reach their designed dimensions.
Failure to run the spindle warmup causes excessive wear and damages the spindle.
Procedure:
- Fit the spindle nut wrench on the control box.
- Start the spindle warmup routine by selecting "Spindle warmup" under "Cuts" in the ShopBot software. It takes around 9 minutes and stops by itself when finished.
Bytte av bit
For å komme lettere til kan man taste 'k' for å få frem keyboard, og kan da bruke pilene for å styre maskinen i X og Y retningene (tips: piltastene er orientert slik maskinen står). Z-aksen styres med PageUp og PageDown.
For å bytte bit benytter man to tenger - den ene er festet til nøkkelen på venstre side av maskinen, og når nøkkelen er tatt ut kan ikke maskinen starte. Den andre tangen skal ligge på hylla til høyre.
Usikker på hvilken vei du skal vri? "Righty tighty, lefty loosy". Huskeregelen gjelder for den nederste tanga.
Collets og collet-nut er slitedeler og kan kjøpes i bitmart. Det ligger noen collets og nuts i forskjellige størrelser ved maskinen, disse er av ukjent kvalitet. Husk å rengjøre støv og spon fra collet'en. TIPS: Bruk trykkluften på maskinen
Det er VELDIG viktig at man kalibrerer Z-aksen på nytt hver gang man bytter drillbit.
Bytte av Støvskjørt
Før beste resultat fra støvutsuget skall riktig lengde støvskjørt brukes. det henger ulike lengder skjørt utenfor Shopbot rommet.
skjøtrt monteres uten vektøy.
press på skjørt på ballene.
Kalibrering
X og Y aksene
X og Y aksene kalibreres ved å trykke på kalibreringsknappen i dataprogrammet.
Fresen vil da kjøre til X=0 Y=0, som er hjørnet over nødstoppen.
Z-aksen
For å kalibrere Z-aksen må man ta ned Z-platen, og feste tangen til metallet på spindelen.
Før man starter selve kalibreringsjobben er det VIKTIG at man husker å teste konnektiviteten. Dette gjøres ved å ta Z-platen inntil borret, og sjekke at Input-lampen i dataprogrammet lyser opp.
Når man har gjort den sjekken plasserer man Z-platen oppå materialet som skal freses, rett under borret, og trykker på knapp i dataprogrammet for å starte kalibreringen. Obs, husk at Z-aksen går ned to ganger før den er ferdig.
Software
V-carve
Les mer om VCarve på egen bitraf wiki-page
Datamaskinen ved siden av fresen har VCarve for å lage verktøybaner og ShopBot kontrollprogram for å styre fresen. Detta er det mest nybegynnervennlige.
Obs: Lisensmodellen til VCarve tillater ikke at man lager klar verktøybaner på en annen maskin hvor bare trial-versjon er installert. Man må gjøre klar filene på en maskin som har fullversjon av VCarve installert. Vi har tre maskiner med fullversion stående på Bitraf.
Fusion 360
Fusion 360 fra Autodesk kan også brukes, både til design og for å lage verktøybaner. Fusion 360 er litt mer avansert, men har også flere funksjoner og mer detaljkontroll.
Les mer om Fusion360 på egen wiki-page
Shopbot control
Ved oppstart av ShopBotsoftware vil man få beskjed om å resette maskinen. Det gjøres med bryter rett over nødstoppen.
Last inn toolpaths ved å bruke File->Load i ShopBot software, og trykk Start knappen. Du vil da få beskjed om å trykke på Start-knappen på fresen, som er den andre knappen over nødstoppen.
Innstillinger
Innstillinger for feeds, speeds osv for forskjellige materialer.
Vcarve tool library
Standard tool library før Vcarve och Shopbot lagt av Jens Dyvik med Bark beetle
Last ned och importera till Vcarve: vcarve-tool-library-with-shopbot-defaults-from-jens.tool eller Fellesverkstedets V-carve tool library som har flere bits og material: fellesverkstedets tool library
Terminologi
- Up-Cut single-flute = Ett fresestål som trekker sponen uppåt, och som har en spånkanal (flute).
- Feed rate = Hur raskt fresen beveger sig horizontellt.
- Plunge rate = Hur raskt fresen beveger sig vertikalt.
- Spindle RPM = Hur raskt fresestålet spinner
- Pass depth = Maxdybde før hur dypt fresetålet kan skæra i denna hastigheten.
- Ramp angle = Vinkeln på hur fresestålet går in på skrå i materialet, alternativet ær å "plunge" då går stålet rætt ned i materialet (dvs ramp angle 90 deg).
Hvis du vil frese "forsiktig" med lave krefter så skal du redusere Pass depth, ikke Feed rate. Grunnen er at om du kjører for sakte så dannes det for mye varme pga friksjon!
Safe settings
- Treverk (alle sorter)
- 6mm Up-Cut single-flute: Feed rate 30mm/s, plunge rate 30mm/s, Spindle RPM 18000, pass depth 19.6mm (OBS! Kolla att du har lang nok egg på fresestålet), ramp angle 45deg
- 6mm Up-Cut single-flute: Feed rate 40mm/s, plunge rate 30mm/s, Spindle RPM 18000, pass depth 10mm , ramp angle 45deg
- 3mm Up-Cut single-flute: Feed rate 15mm/s, plunge rate 10mm/s, Spindle RPM 18000, pass depth 5mm , ramp angle 45deg
- Aluminium
- 6mm Up-Cut single-flute: Feed rate 12mm/s, plunge rate 8mm/s, Spindle RPM 18000, pass
depth 2.5mm, ramp angle 12deg
- 3mm Up-Cut single-flute: Feed rate 9mm/s, plunge rate 6mm/s, Spindle RPM 18000, pass depth 1.2mm, ramp angle 12deg
- 2mm Up-Cut single-flute: Feed rate 8mm/s, plunge rate 5mm/s, Spindle RPM 18000, pass depth 0.7mm, ramp angle 12deg
- 30mm V-bit double-flute: Feed rate 40mm/s, plunge rate 6mm/s, Spindle RPM 18000, pass depth 0.5mm, ramp angle 12deg
- 6mm V-bit single-flute: Feed rate 11mm/s, plunge rate 6mm/s, Spindle RPM 18000, pass depth 1.0mm, ramp angle 12deg
- POM
- 6mm Up-Cut single-flute: Feed rate 22mm/s, plunge rate 15mm/s, Spindle RPM 18000, pass depth 8mm, ramp angle 18deg
- 3mm Up-Cut single-flute: Feed rate 18mm/s, plunge rate 12mm/s, Spindle RPM 18000, pass depth 4mm, ramp angle 18deg
- Safe settings spreadsheet, extern lenke
Feeds and speeds spreadsheet før bitrafs shopbot
Spoilboard
The spoilboard sacrificial layer is a MDF/HDF valchromat surface used to fasten stock to the machine before milling.
Never cut deeper than 0.4 mm into the spoilboard. You are responsible to repair and pay for deeper spoilboard cuts. Fine 100 NOK per mm below this, minium 100 NOK.
Direct fastening to the sacrificial layer must only be done with removable screws. Any other fastening methods like glue / tape etc are not allowed directly on the spoilboard.
The surface gets worn over time and requires maintenance by regular flattening / resurfacing. If it’s in bad condition please send a notification to #cnc at Slack for instructions or help on resurfacing procedure.
It is important to remove any fasteners that get stuck in the spoilboard after every use of the shopbot. During resurfacing any stuck metal parts destroys the planing tool and inflicts unnecessary costs for Bitraf.
- Never use glue / tape / adhesives directly on the spoilboard
- Only use removable screws when fastening stock.
- Avoid screws close to edges where the board can easily fracture
- Always remove all fasteners in the spoilboard. If you break a screw it must be dug up and completly removed.
Klar for fresing?
- Er XY aksene kalibrert?
- Er Z aksen kalibrert?
- Har du dobbelsjekket at riktig toolpath er valgt?
- Er det riktig bit som står i?
- Er materialet godt nok festet til offerplaten?
Før fresejobben starter må man skru på avsuget. Det gjøres med den grønne bryteren. Det er lurt å vente til støvsugeren har startet opp helt før man starter fresejobben.
Obs - gjør deg kjent med hvor brannslukkingsapparat er før du starter!
Cleaning and end procedure
Always leave the machine in the same or better condition after you have finished your work. If the machine is in bad condition / dirty / has faults report it to #cnc at slack.
- General
- Put all parts back in it's proper location. If something is missing or broken report it to #cnc at Slack
- Lock the padlock
- Put key back and remember to check out the tool
- Exit the shopbot application on the computer.
- Vacuum the machine in general, use the checklist after general cleaning.
- Gantry - cables and E-chain
- Rail - vertical slots
- Spindle and dust foot and skirt often has leftover residue, shake the dust hose while running the dust extraction vacuum. Aluminium milling is especially prone to this
- Control box and VFD - horizontal top surface
- Frame - horizontal lower L bars, vertical angle triangle support, inside vertical support feet
- Clean all collets and nuts before putting them back. Remove all stuck bits and dust. If using the high pressure air make sure you hold the collet/nut firmly to avoid it from flying away.
- Spoilboard
- Remove all dust with horizontal roller brush
- Remove brush and use hose end directly on residue stuck in cavities
- Point the compressed air from the spindle nozzle to remove stuck chips
- If you find any broken screws report it to #cnc at Slack immediately
NOTE: After milling aluminium it's especially important to remove residue. It's impossible to inspect the spoilboard for leftover steel screws before resurfacing when metal part residue are everywhere, this damages bitrafs expensive surface bits. TIP: Cover up the parts of the spoilboard you are not using when milling aluminium to reduce cleanup time.
Punktliste for fresingen
Dette er en ikke utfyllende, steg for steg-oppskrift, skrevet ned etter et kurs. Shopbot, veileder
- Sjekke ut nøkkel i tools
- Sjekke sikkerhetsverktøyet
- Sjekk støvsuger
- Skru på maskinen med hovedbryteren på kontrollboksen ved siden av shopboten (hengelås åpnes med nøkkel fra tools)
- Sette på bit i collet, sjekk for støv og flis
- Skru på Shopbots kontrollsoftware
- Trykk Ok, så den blå Resett-knappen på veggen slukker lampe nr 4
- Reset default settings i Utilities menyen
- Home X,Y aksen med automatisk med proximity switches, C3
- Flytt maskinen til toolchange position C1. Evt bruk for keyboard K (for å kjøre) piltaster for xy, pg up dwn for z.
- Sett bit og collet i spindelen, stram til
- Sett strammeverktøy i nøkkel på siden og vri ned
- Kjør warmup spindel-rutine C5
- Legg i materialet
- Fest med clamps
- Kjør til stabilt underlag og legg under kalibreringsplaten, kommando C2. Klem kalibreringsplaten ned mens du kjører kalibreringen, hold fingrene i god avstand fra biten
- Set ev egen origo med med K og "zero axis" - blå knapp. Pass på å ikke resette Z aksen. Den bør kun settes ved kalibrering og ikke manuelt.
- Sett på støvhette
- Lukk dører og vindu
- File load ev. Cut part
- Start
- Spindel starter automatisk, Vær sikker på at spindel har startet.
- Start støvsuger
- Trykk OK, og vent til ferdig. Trykk Mellomrom på tastaturet for soft stop.
- Fortsett med evt flere filer med Cut part igjen.
Støvsug og rydd. Det skal være ryddigere enn når du overtok rommet.
Fikse problemer
Feilmelding om Software table limits violations
Denne feilmeldingen kommer når man forsøker å flytte spindelen utenfor eller ned i offerplata. Begrensningene er definert på hver akse (X, Y, Z)
Feilmeldingen oppstår ved keyboard navigation:
Når maskinen startes opp vet den ikke hvor spindelen befinner seg i forhold til offerplata. Feilen oppstårDen kan oppstå på alle aksene (X, Y og Z)
- Ved feilmelding om X og Y akse, kjør kommando (kommando C3) for automatisk kalibrering av X, Y aksen i forhold til offerplata
- Ved feilmelding om Z akse, kalibrer Z aksen manuelt med (kommando C2)
Feilmeldingen oppstår under fresing:
- Ved feilmelding om Z akse: Toolpathene i filen som er lastet for fresing går for dypt i offerplata. Sjekk fila. IKKE TRYKK OK - Det vil ødelegge offerplata
- Ved feilmelding om X eller Y akse: Toolpathene i filen som er lastet for fresing går utenfor offerplata. Dette er som regel en feil med toolpathen, men det vil ikke skade maskinen og overstyre feilmeldingen.
Easy mode
Softwaren har to moduser. Easy og Full mode. For å bytte fra Easy til Full mode kan man gjøre følgende:
Parameter reset
Hva gjør det: Återstiller instillningerne i motordriverne i shopbot-skapet.
Gjør dette når:
- Shopbotten beter seg rart, rykkete bevegelser, for rast eller langsam jogging.
- Den gir feilmeldinger om endestopp selv om spindelen står midt på fresebordet.
- Andre rare feilmedlinger
- Etter at software har krashet
- Du ønsker standard-instillninger for acceleration og maxhastighet.
Da kan det være nødvendig med en parameter reset.
Hvordan: I styreprogrammet ShopBot Control velg i menyen
- Utilities
- Reset Settings
- Load Custom
- tryck yes to ganger
- velg Bitraf Settings i mappe C:\ShopBot 3\Settings
Finner du ikke fila på shopbot PCn så finnes backup av fila her på github
Driver Fault! (Location No Longer ACCURATE...)
Driver Fault! (Out of range...)
nå man får denne melingen så stenges shopbot software ned når du trykker ok.
Hvordan: Suggested solutions:
- Reload to default configuration file
- It might be stuck on an end-stop. Power the machine off and move it SLOWLY (MAXIMUM a few centimeters a second) - the stepper motors acts like generators and quick movement can permanently damage the machine manually a few cm inwards. You need to run zero routine on all axes afterwards.
- Other possible fixes: turn both the PC and the Shopbot completely off, start them again; PC first, wait two minutes, then Shopbot. Also try loading the settings file. All of these things might need doing several times consecutively before it works.
DOOR! & Safety interlock = Kan inte starta spindel
Om du inte kan starta spindlen och den klagar på "safety interlock" kolla att du har stengt vindu og dørrer.
COMPUTER NOT TURNING ON AT ALL!
Assuming you've checked all the usual suspects (cables, power plug, etc.) and the computer still does not turn on, try opening up the computer case and removing the battery then placing it back again. It does take quite a bit of screwing to do this, but it has become a known issue/fix as of November 2022.
You may face the next issue, so keep reading.
Computer turns on but fails to boot
If you're getting a black screen with the message "Reboot and Select proper Boot device ...", follow these steps to fix the boot settings in the BIOS:
- Restart the computer by pressing (and holding) the power button on the computer case
- As quickly as you can, press the magic key that gets us into BIOS. It's typically F1, F2, F10, F12, Delete, or Esc, but each computer is different. Until someone documents what the right key for this particualr Shopbot computer is, try running your finger from ESC to F12 in a piano glissando style while trying DEL as well. Do that until BIOS shows up.
- In BIOS (blue screen), use the arrow keys to navigate to the "Boot" tab
- Edit "Boot Option #1" and make sure the selected option is "Windows Boot Manager"
- Press "F10" to save and exit
- The computer should restart automatically and boot into Windows as intended
For viderekommende erfarne brukere
Maskinens innstillinger kan endres med kommandolinjen. Hvis man utfører endringer her er det viktig å alltid laste standardkonfigurasjonen når man avslutter arbeidet med maskinen.
Command refrence finnes på : https://www.shopbottools.com/ShopBotDocs/files/ComRef.pdf
Endre jog / move speeds
Kommando VS i kommandolinjen. Aldri gå over 400mm/s da steppermotorene kan miste steps. Det bør være raskt nok uansett.
Override software table limits
Det er mulig å slå av software begrensningen som gir feilmeldinger når man går utenfor X,Y og Z aksene. Det finnes få gode grunner til å gjøre dette og skal kun utføres av erfarne brukere.
Kommando SF i kommandolinjen.
Maintenance software
Passcode can be updated by editing shopbot.opt file at Program Files (x86)\ShopBot\Shopbot 3\shopbot.opt . It can also be disabled in this file.
