Forskjell mellom versjoner av «Router table»
(→Usage instructions: add the rest of the instructions) |
(→Usage: Use gallery instead of floats) |
||
| Linje 11: | Linje 11: | ||
== Usage == | == Usage == | ||
Feed the workpiece from right to left. Do not feed it left to right. | Feed the workpiece from right to left. Do not feed it left to right. | ||
| − | |||
| − | |||
Do '''not''' sandwich the workpiece between the bit and the fence. You run a high risk of the bit grabbing the workpiece and pulling it uncontrollably along, maybe shooting it out the other end and hitting something, and possibly chew up your hands in the process. | Do '''not''' sandwich the workpiece between the bit and the fence. You run a high risk of the bit grabbing the workpiece and pulling it uncontrollably along, maybe shooting it out the other end and hitting something, and possibly chew up your hands in the process. | ||
| − | |||
Do not start the router while the workpiece is touching the bit. | Do not start the router while the workpiece is touching the bit. | ||
Consider using a featherboard whenever possible. It helps push the workpiece against the bit, fence or table and prevents kickback. Note that the arrow on the featherboard should point in the direction the workpiece is moving. The featherboard can hold the workpiece down against the table, hold the workpiece once it has passed by the bit, or hold the workpiece before it enters the bit. | Consider using a featherboard whenever possible. It helps push the workpiece against the bit, fence or table and prevents kickback. Note that the arrow on the featherboard should point in the direction the workpiece is moving. The featherboard can hold the workpiece down against the table, hold the workpiece once it has passed by the bit, or hold the workpiece before it enters the bit. | ||
| − | |||
Use push sticks, push blocks, random pieces of wood, or even a literal cucumber to push the workpiece through the bit, but do not use any of your bodyparts. Keep your fingers away from the insert rings at all times. | Use push sticks, push blocks, random pieces of wood, or even a literal cucumber to push the workpiece through the bit, but do not use any of your bodyparts. Keep your fingers away from the insert rings at all times. | ||
| − | |||
If you are cutting a small piece, consider using a jig to keep your hands clear from the danger zone. Clamp the small piece to the jig before cutting. | If you are cutting a small piece, consider using a jig to keep your hands clear from the danger zone. Clamp the small piece to the jig before cutting. | ||
If you are using a larger bit, perform the cut in several passes rather than forcing the cut through. This will damage the bit, the machine, likely your workpiece, and might be dangerous. | If you are using a larger bit, perform the cut in several passes rather than forcing the cut through. This will damage the bit, the machine, likely your workpiece, and might be dangerous. | ||
| + | |||
| + | |||
| + | <gallery mode=packed style="text-align: left"> | ||
| + | Router feed direction.jpg|Figure 1 - Feed workpieces left to right. | ||
| + | Router do not sandwich the workpiece.jpg|Figure 2 - Do not sandwich the workpiece between the bit and the fence. | ||
| + | Router featherboard.jpg|Figure 3 - Use the featherboard whenever practicable. Pay attention to the arrow. | ||
| + | Router danger zone.jpg|Figure 4 - Keep your fingers outside the insert rings. | ||
| + | </gallery> | ||
{{float end}} | {{float end}} | ||
Revisjonen fra 23. aug. 2026 kl. 13:01
The router table is one of the more dangerous woodworking tools available at Bitraf. This article will describe usage instructions for the router table.
Adapting https://docs.google.com/document/d/11KHUgdGal7CzAKQ8kEJ99_KqaOeYbEfA5K8S4P3GOnc/edit?tab=t.0
Innhold
Safety practices
Dress
Do not wear long sleeves. Wear a t-shirt, short sleeve shirt, or roll up your sleeves. Do not wear any loose clothing, have dangling jewelry, hair, or anything else that might get entangled.
Wear protection! Ear protection, hearing protection (the router is LOUD), and dust protection. Do not wear gloves, as they can be caught in the router bit and pull your hand in.
Usage
Feed the workpiece from right to left. Do not feed it left to right.
Do not sandwich the workpiece between the bit and the fence. You run a high risk of the bit grabbing the workpiece and pulling it uncontrollably along, maybe shooting it out the other end and hitting something, and possibly chew up your hands in the process.
Do not start the router while the workpiece is touching the bit.
Consider using a featherboard whenever possible. It helps push the workpiece against the bit, fence or table and prevents kickback. Note that the arrow on the featherboard should point in the direction the workpiece is moving. The featherboard can hold the workpiece down against the table, hold the workpiece once it has passed by the bit, or hold the workpiece before it enters the bit.
Use push sticks, push blocks, random pieces of wood, or even a literal cucumber to push the workpiece through the bit, but do not use any of your bodyparts. Keep your fingers away from the insert rings at all times.
If you are cutting a small piece, consider using a jig to keep your hands clear from the danger zone. Clamp the small piece to the jig before cutting.
If you are using a larger bit, perform the cut in several passes rather than forcing the cut through. This will damage the bit, the machine, likely your workpiece, and might be dangerous.
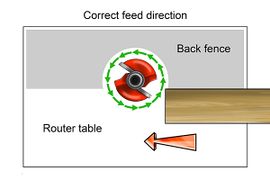
Figure 1 - Feed workpieces left to right.
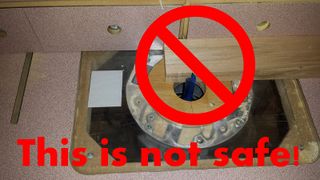
Figure 2 - Do not sandwich the workpiece between the bit and the fence.
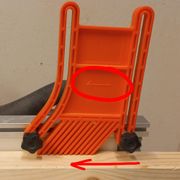
Figure 3 - Use the featherboard whenever practicable. Pay attention to the arrow.
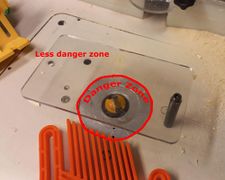
Figure 4 - Keep your fingers outside the insert rings.


Usage instructions
Select a proper bit
Select a bit. Ensure that the bit is undamaged. Select a collet that properly fits the bit as well: it should fit snugly but not need (or be possible to) force it in. Note that diameter of the bit, since this is used to set the router speed.
Install the bit in the router
Make sure the router switch is set to off. If the router switch is on, a shield on the router will prevent you from raising it.
Raise the router to its maximum height using the crank (marked as 1 in figure 5). Never use force when adjusting the router. If you feel resistance, ask somebody to help. Using force WILL break the machine. The crank can be a bit finnicky so you may need to wiggle it around a bit before it catches the winch. Try making sure it is as vertical as possible.
If there is already a collet, loosen the collet by turning it counter-clockwise using the wrench (marked as 2 in figure 5). There should probably not be one installed if you just started using the machine.
Insert the collet, insert the bit, retract it by about 1mm, and tighten the collet.
Place insert rings around the collar if possible to minimize the gap between the bit and the ring.
Finally, lower the bit to the desired height using the crank.
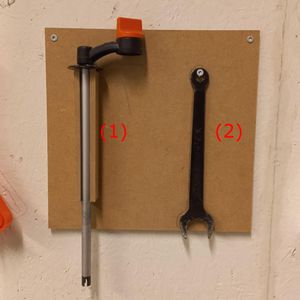
Figure 5 - (1) Crank (2) Collet wrench
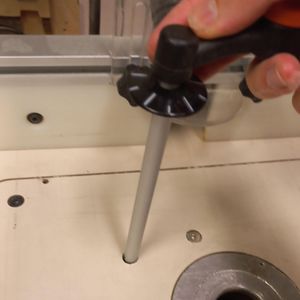
Figure 6 - Using the crank
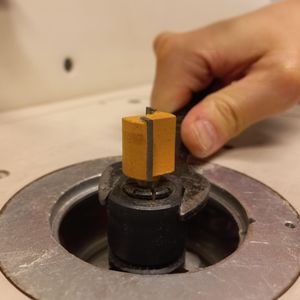
Figure 7 - Wrenching the collet


Set the router speed
Adjust the router speed according to the diameter you determined earlier. Consult the table below or see the posted table on the wall for the appropriate settings.

| Setting | RPM | Cutter diameter |
|---|---|---|
| 5 | 21 000 | Up to 25mm (1") |
| 4 | 18 000 | 25–50mm (1"–2") |
| 3 | 14 500 | 50–65mm(2"-2½") |
| 2 | 11 000 | Over 65mm (2½") |
| 1 | 8000 | Use only if burning |
Set safety features
If you are using the fence, consider installing the bit guard.
If you are using the router without a fence, consider installing the free hand bit guard.
Use feather boards if practicable.
Connect the vacuum
Before turning the router on
Ensure the work surface of the table is clean and clear of any tools or debris.
Return the crank and wrench to the wall.
Make sure you have any push sticks or blocks prepared.
Turning on the router
Make sure the router switch is set to off.
Unlock the router plug using the key and insert it into the safety switch on the table.
Plug the safety switch into the vacuum.
Set the vacuum to Auto and plug it into the wall.
Switch the router on by pushing back the switch guard and pressing the switch. Don't press the switch if it's lit up, as that means the safety switch is on.
Finally, turn on the router by pressing the green button on the safety switch. The red button turns the router off again.

After using the machine
Turn off the safety switch AND the router switch.
Unplug the safety switch and router.
Remove the collet and bit and return everything to its place.
Clean up dust using the vacuum.
Lock the plug and return the key to the tools cabinet.
Check out on the tool table.
